我们在这里准备了两个组件,宠物类和用户类,用户类包含用户姓名和年龄,宠物类包含宠物名
public class User {public String name;public int age;public User() {}public User(String name, int age) {this.name = name;this.age = age;}public String getName() {return name;}public void setName(String name) {this.name = name;}public int getAge() {return age;}public void setAge(int age) {this.age = age;}@Overridepublic String toString() {return "User{" +"name='" + name + '\'' +", age='" + age + '\'' +'}';}
}
public class Pet {public String name;public Pet(){}public Pet(String name) {this.name = name;}public String getName() {return name;}public void setName(String name) {this.name = name;}@Overridepublic String toString() {return "Pet{" +"name='" + name + '\'' +'}';}
}
如果我们是用原生的spring,我们想要把它们添加到容器中,我们可以创建一个spring的配置文件,
<?xml version="1.0" encoding="UTF-8"?>
<beans xmlns="http://www.springframework.org/schema/beans"xmlns:xsi="http://www.w3.org/2001/XMLSchema-instance"xsi:schemaLocation="http://www.springframework.org/schema/beans http://www.springframework.org/schema/beans/spring-beans.xsd"><bean id="user01" class="com.yujie.boot.bean.User"><property name="name" value="zhangsan"></property><property name="age" value="18"></property></bean><bean id="cat" class="com.yujie.boot.bean.Pet"><property name="name" value="Tomcat"></property></bean>
</beans>
而现在我们的springboot已经不需要写这些xml配置文件了,springboot怎么给容器中添加这些组件呢?
在springboot底层我们可以使用@Configuration注解
java注解是怎么实现的、config类
/*
1.配置类里面使用@Bean标注在方法上给容器注册组件,默认也是单实例的。
2.配置类本身也是组件
3.该注解里面有boolean proxyBeanMethods() default true;与springboot1的不同proxyBeanMethods属性默认为true代表代理bean的方法Full、Lite配置Full模式:proxyBeanMethods如果是true, 无论调用了多少次,都是从容器中找组件。Full模式Lite模式:将其调成false,配置类在容器中不会保存代理对象,在外面每一次调用一次,都会新创建对象组件依赖。比如我们在User类里面加入了Pet组件,此时应该把proxyBeanMethods设置为true,就是对的,说明user依赖了pet组件* */
@Configuration(proxyBeanMethods=true)  //告诉springboot这是一个配置类,等同于以前的配置文件
public class MyConfig {/*给容器中添加组件,以方法名作为组件的id,返回类型就是组件类型。返回的值,就是组件在容器中的实例外部无论对这个配置类中的这个组件注册方法调用多少次,获取的都是之前注册容器中的单实例。* */@Beanpublic User user01(){return new User("zhangsan",18);}@Bean("tom")     //注解中直接赋予名字,此时方法名就不作为组件的idpublic Pet tomcatPet(){return new Pet("tomcat");}}
主程序类
/*
* @SpringBootApplication该注解告诉这是一个springboot应用
* 主程序类。所有启动的入口
* 固定写法
* */
@SpringBootApplication(scanBasePackages="com.yujie")
public class MainApplication {public static void main(String[] args) {//1.返回我们的IOC容器ConfigurableApplicationContext run=SpringApplication.run(MainApplication.class,args);//2.查看容器里面的组件String [] names=run.getBeanDefinitionNames();
//        for(String name:names){
//            System.out.println(name);
//        }//3.从容器中获取组件Pet tom01=run.getBean("tom",Pet.class);Pet tom02=run.getBean("tom",Pet.class);System.out.println("组件"+(tom01==tom02));//配置类本身也是一个组件,我们看能不能获取配置类//这里本身就是代理对象MyConfig bean=run.getBean(MyConfig.class);System.out.println(bean);//当使用proxyBeanMethods=true时,我们直接调用配置类中的方法//也就是代理对象调用的方法//springboot总会检查这个组件是否在容器中有,如果有就不会新创建,一句话就是保持组件单实例//如果是false,此时就不再是代理对象,多次调用的时候输出就是falseUser user=bean.user01();User user1=bean.user01();System.out.println(user=user1);}
}
示例
最佳实战
配置类组件之间无依赖关系用Lite模式加速容器启动过程,减少判断
配置类组件之间有依赖关系,方法会被调用得到之前单实例组件,用Full模式
再次总结一下轻量级模式和全模式模式:
调成false轻量级模式,springboot就不会去检查这个方法返回的东西在容器中有没有,即跳过检查,运行起来就会比较快。
调成true全模式,每一次外界对它的调用都会去容器中检查有没有。
推荐:如果只是给容器中注册组件,别人也不依赖我们的组件,我们一般都把它调成false,这样加载起来也比较快
如果我们组件在后面还要用,还要依赖,就设置为true,能保证依赖的组件就是容器中的依赖
给容器中注册组件也可以使用以前的办法,比如上面,可以使用@Component代表是一个组件。@Controller、@Service、@Repository代表控制层、逻辑层、数据库层组件,默认只要这些组件写在包扫描的范围内。它们都是以前的用法
@configuration注解?ComponentScan指定包扫描规则。
@Import可以给容器中导入组件。可以写在配置类或者组件里面。
@Import({User.class, DBHelper.class})给容器中自动创建出这两个类型的组件、默认组件的名字就是全类名
配置类
@Import({User.class, DBHelper.class})
@Configuration(proxyBeanMethods = false) //告诉SpringBoot这是一个配置类 == 配置文件
public class MyConfig {
}
测试类
//1、返回我们IOC容器
ConfigurableApplicationContext run = SpringApplication.run(MainApplication.class, args);//...//5、获取组件
String[] beanNamesForType = run.getBeanNamesForType(User.class);for (String s : beanNamesForType) {System.out.println(s);
}DBHelper bean1 = run.getBean(DBHelper.class);
System.out.println(bean1);
条件装配:满足Conditional指定的条件,则进行组件注入
下图是它派生的各种注解

每一个注解都代表不同的功能,比如ConditionalOnBean:即当容器中存在我们指定的bean的时候,我们才干某些事情,ConditionalOnMissingBean,当容器中没有这些组件的时候,我们就干某些事情,ConditionOnclass,当容器中有某些类的时候,我们才干某种事情。ConditionalResource.当项目的类路径中存在指定的资源的时候,才干某些事情.ConditionalOnWebApplication.当我们是web应用的时候,我们才干某些事情,ConditionalOnSingleCandidate,指定组件只有一个实例,或者多个实例,但只有一个主实例,等等。
实例,当我们把MyConfig类中的tomcatPet方法上面的@Bean注解注释掉之后,
@Beanpublic User user01(){return new User("zhangsan",18);}//@Bean("tom") //注解中直接赋予名字,此时方法名就不作为组件的idpublic Pet tomcatPet(){return new Pet("tomcat");}
Spring注解,主程序类中输出
boolean tom=run.containsBean("tom");System.out.println("容器中Tom组件 :" +tom);boolean user01=run.containsBean("user01");System.out.println("容器中Tom组件 :" +user01);

注意,此时User类中包含组件Pet类
public class User {public String name;public int age;public Pet pet;public User() {}public User(String name, int age) {this.name = name;this.age = age;}public String getName() {return name;}public void setName(String name) {this.name = name;}public int getAge() {return age;}public void setAge(int age) {this.age = age;}public Pet getPet() {return pet;}public void setPet(Pet pet) {this.pet = pet;}@Overridepublic String toString() {return "User{" +"name='" + name + '\'' +", age=" + age +", pet=" + pet +'}';}
}

由于我们用户依赖这个宠物,而我们容器中没有这个宠物,所以也希望容器中没有宠物的时候,也别注册用户了。所以我们可以使用@ConditionalOnBean注解,也就是在容器中有某个组件,我们就可以干嘛
@ConditionalOnBean(name=“tom”)表示当容器中有tom这个组件的时候,我们就给容器中注入user01
@ConditionalOnBean(name="tom")@Beanpublic User user01(){return new User("zhangsan",18);}

如果我们在类上写上
@ConditionalOnBean(name="tom")
public class MyConfig {
}
docker底层技术、当容器中有tom组件的时候,下面一堆才生效,否则就都不生效。
条件注解写到方法上,只有当条件成立之后, 这个方法返回的组件才会被注册到类中。否则就不生效。写在类上也类似。
@ConditionalOnMissingBean(name=“tom”)表示当容器中没有tom组件,我们就创建。
假如我们此时也有配置文件beans.xml
<?xml version="1.0" encoding="UTF-8"?>
<beans xmlns="http://www.springframework.org/schema/beans"xmlns:xsi="http://www.w3.org/2001/XMLSchema-instance"xsi:schemaLocation="http://www.springframework.org/schema/beans http://www.springframework.org/schema/beans/spring-beans.xsd"><bean id="user01" class="com.yujie.boot.bean.User"><property name="name" value="haha"></property><property name="age" value="18"></property></bean><bean id="cat" class="com.yujie.boot.bean.Pet"><property name="name" value="hehe"></property></bean>
</beans>

springboot修改注解?可以看到,配置文件并没有生效,
如果我们不想放弃这个配置文件怎么办
比如,公司使用bean.xml文件生成配置bean,然而你为了省事,想继续复用bean.xml,@ImportResource粉墨登场。
@ImportResource注解可以导入spring的配置文件,让其生效。
当我们加上了注解之后
@ImportResource(“classpath:beans.xml”)
public class MyConfig {
}
Springboot常用注解,
如何利用Java读取到properties文件中的内容,并且把它封装到Javabean中,以供随时使用
传统方法:
public class getProperties {public static void main(String[] args) throws FileNotFoundException, IOException {Properties pps = new Properties();pps.load(new FileInputStream("a.properties"));Enumeration enum1 = pps.propertyNames();//得到配置文件的名字while(enum1.hasMoreElements()) {String strKey = (String) enum1.nextElement();String strValue = pps.getProperty(strKey);System.out.println(strKey + "=" + strValue);//封装到JavaBean。}}}
Spring Boot一种配置配置绑定:
@ConfigurationProperties + @Component
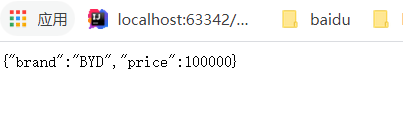
springboot注解大全、假设有配置文件application.properties
mycar.brand=BYD
mycar.price=100000
只有在容器中的组件,才会拥有springboot提供的强大功能
@Component
@ConfigurationProperties(prefix = "mycar")
public class Car {private String brand;private Integer price;public String getBrand(){   return brand;}public void setBrand(String brand){ this.brand=brand;}public Integer getPrice() {return price;}public void setPrice(Integer price) {this.price = price;}@Overridepublic String toString() {return "Car{" +"brand='" + brand + '\'' +", price=" + price +'}';}
}
控制器
public class HelloController {@AutowiredCar car;@RequestMapping("/car")public Car car(){return car;}/*这里表示请求的路径是/hello*/@RequestMapping("/hello")public String handle01(){return "hello,Spring Boot 2";}}
1.开启Car配置绑定功能
2.把这个Car这个组件自动注册到容器中
@EnableConfigurationProperties(Car.class)
public class MyConfig {
...
}
@ConfigurationProperties(prefix = "mycar")
public class Car {
...
}
Springboot,要么加载到容器中,要么开启配置绑定功能。
版权声明:本站所有资料均为网友推荐收集整理而来,仅供学习和研究交流使用。

工作时间:8:00-18:00
客服电话
电子邮件
admin@qq.com
扫码二维码
获取最新动态


![Bzoj4822 [Cqoi2017]老C的任务](/upload/rand_pic/2-001.jpg)


![[高性能javascript笔记]1-加载和执行](https://www.oschina.net/img/hot3.png)
