This article is an in-depth guide on how PowerShell can be used to maintain and manage SQL backup on Linux and Windows machines.
本文是有關如何使用PowerShell在Linux和Windows計算機上維護和管理SQL備份的深入指南。
Here’s an outline of what this article is all about:
以下是本文的概述:
Windows任務欄? Tools to take SQL database backups, such as sqlcmd, SSMS, and PowerShell, are common to all platforms supported by SQL Server. In this post, I’m going to show how you can backup your SQL Server 2017 databases on a Linux machine using PowerShell.
進行SQL數據庫備份的工具(例如sqlcmd,SSMS和PowerShell)對于SQL Server支持的所有平臺都是通用的。 在本文中,我將展示如何使用PowerShell在Linux計算機上備份SQL Server 2017數據庫。
The latest version of SSMS is optimized to work efficiently with SQL Server 2017 on Linux. To download and install the latest version, see?Download SQL Server Management Studio.
Windows強制關機、 最新版本的SSMS經過優化,可與Linux上SQL Server 2017高效配合使用。 要下載并安裝最新版本,請參閱下載SQL Server Management Studio 。
Launch PowerShell and import the?sqlserver?module
啟動PowerShell并導入sqlserver模塊
Let’s start by launching PowerShell on Windows. Open a?command prompt?on your Windows computer, and type?PowerShell?to launch a new Windows PowerShell session.
讓我們從在Windows上啟動PowerShell開始。 在Windows計算機上打開命令提示符 ,然后鍵入PowerShell以啟動新的Windows PowerShell會話。
shell執行sql。PowerShell
電源外殼
SQL Server provides a Windows PowerShell module named?SqlServer?that can be used to import the SQL Server components (SQL Server provider and cmdlets) into a PowerShell environment. (The name of the SQL PowerShell module for SSMS has changed from SQLPS to SQLServer.)
SQL Server提供了一個名為SqlServer的Windows PowerShell模塊,可用于將SQL Server組件(SQL Server提供程序和cmdlet)導入PowerShell環境。 (用于SSMSSQL PowerShell模塊的名稱已從SQLPS更改為SQLServer。)
SSMS uses the new wrapper EXE to instantiate the SQL PowerShell environment. If you do not have the module, use the Install-Module cmdlet to install the SqlServer module. This will add new functionality and cmdlets to your PowerShell session. The new module will be installed to “%Program Files%\WindowsPowerShell\Modules\SqlServer”.
Windows資源管理器, SSMS使用新的包裝程序EXE實例化SQL PowerShell環境。 如果沒有該模塊,請使用Install-Module cmdlet安裝SqlServer模塊。 這會將新功能和cmdlet添加到PowerShell會話中。 新模塊將安裝到“%Program Files%\ WindowsPowerShell \ Modules \ SqlServer”。
Copy and paste the command below at the PowerShell prompt to import the?SqlServer?module into your current PowerShell session:
將以下命令復制并粘貼到PowerShell提示符下,以將SqlServer模塊導入當前的PowerShell會話中:
PS P:\> Import-Module -name SqlServer -DisableNameChecking
Type the command below at the PowerShell prompt to verify that the?SqlServer?module was imported correctly:
在PowerShell提示符下鍵入以下命令,以驗證SqlServer模塊是否已正確導入:
PS P:\> Get-Module -name SqlServer
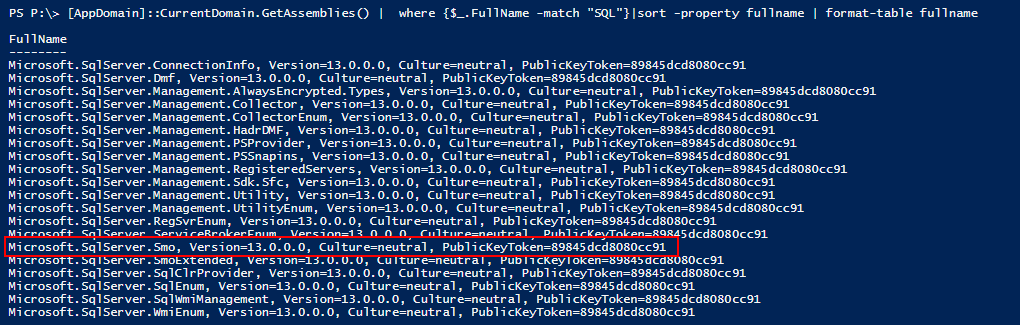
How to find what assemblies are loaded in windows
如何查找Windows中加載了哪些程序集
MySQL shell。 Based on the version of PowerShell, load the associated assembly. In most cases, the following command should be able to find and load the SQL server SMO assembly.
根據PowerShell的版本,加載關聯的程序集。 在大多數情況下,以下命令應能夠找到并加載SQL Server SMO程序集。
The AppDomain.GetAssemblies method gets the assemblies that have been loaded into the execution context of this application domain.
AppDomain.GetAssemblies方法獲取已加載到此應用程序域的執行上下文中的程序集。
PS P:\> [AppDomain]::CurrentDomain.GetAssemblies() |??where {$_.FullName -match "SQL"}|sort -property fullname | format-table fullname
windows10備份?
If you know the full assembly name use the .Load() method.
如果知道完整的程序集名稱,請使用.Load()方法。
PS P:\>[reflection.assembly]::Load("Microsoft.SqlServer.Smo, Version=13.0.0.0, Culture=neutral,PublicKeyToken=89845dcd8080cc91")
Windows、 or,
要么,
PS P:\> Add-Type -Assembly "Microsoft.SqlServer.Smo, Version=13.0.0.0, Culture=neutral, PublicKeyToken=89845dcd8080cc91
Remember that the function, LoadWithPartialName has been deprecated. The recommended solution for PowerShell is to use Add-Type or load the specific library.
請記住,不推薦使用LoadWithPartialName函數。 對于PowerShell,推薦的解決方案是使用Add-Type或加載特定的庫。
How to handle Credentials in Powershell
sqlserver數據庫備份計劃。 如何在Powershell中處理憑證
The three ways of managing credentials are as follows
憑證管理的三種方式如下
Often, we encounter a case where a password is hard coded in the script.?Of course,?the problem with this is that your password will be exposed to anyone with access to the script file.
通常,我們會遇到在腳本中硬編碼密碼的情況。 當然,這樣做的問題是您的密碼將向有權訪問腳本文件的任何人公開。
powershell結束進程, The below sample code depicts the use of hard coded credential in the script
以下示例代碼描述了腳本中硬編碼憑據的使用
# The Linux SQL instance IP address
$serverInstance = "10.2.6.50"
$User = 'SA'
# Convert plain text into a secure string
$Pass = ConvertTo-SecureString 'thanVitha@2015' -AsPlainText –Force
#supply the $Pass variable as SecureString for the password
$Credentials = New-Object -TypeName System.Management.Automation.PSCredential -ArgumentList $User,$Pass
#Build the connection
$server = New-Object ('Microsoft.SqlServer.Management.Smo.Server') $serverInstance
# Set credentials
$server.ConnectionContext.LoginSecure=$false
$server.ConnectionContext.set_Login($Credentials.UserName)
$server.ConnectionContext.set_SecurePassword($credentials.Password)
# Connect to the Server and get a few properties
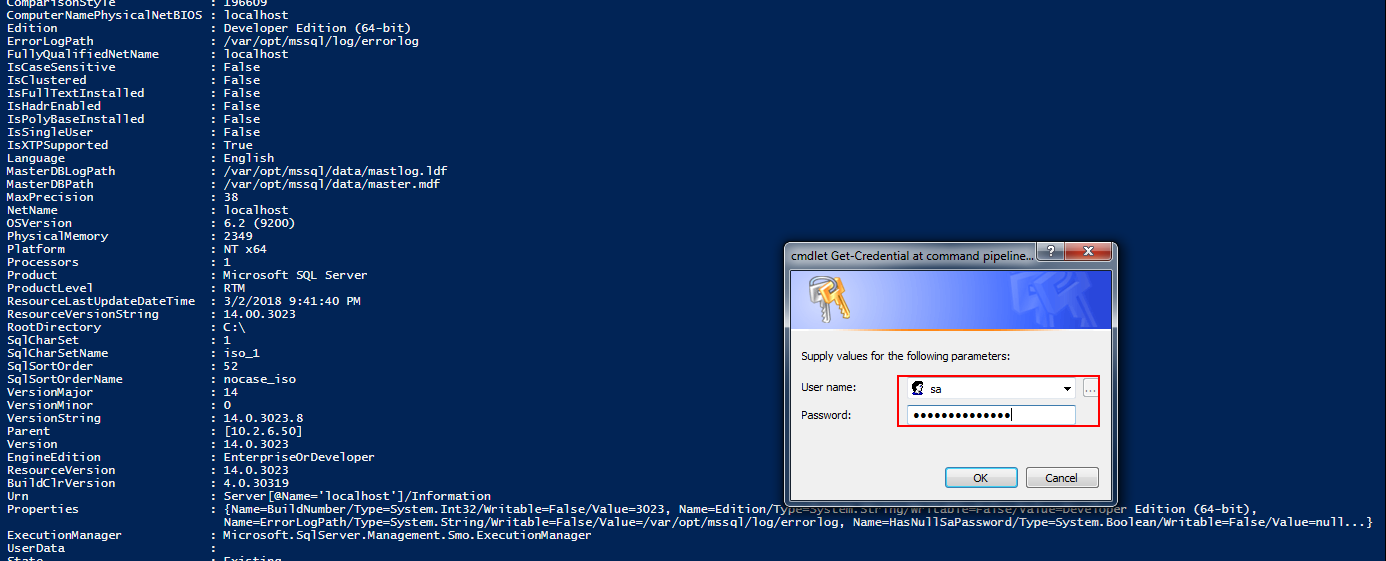
$server.Information
The output is given below
輸出如下
Get-Credential displays a window to enter credential details. This will appear every time you run the script. The $credential variable stores the?username?and password.?The credentials are then fed to the respective queries for further processing.
Get-Credential顯示一個窗口,用于輸入憑據詳細信息。 每次您運行腳本時都會出現。 $ credential變量存儲用戶名和密碼。 然后將憑證饋送到各個查詢以進行進一步處理。
The below sample code depicts the use of Get-Credential cmdlet
下面的示例代碼描述了Get-Credential cmdlet的用法
# The Linux SQL instance IP address
# Prompt for credentials to login into SQL Server
$serverInstance = "10.2.6.62"
$credential = Get-Credential
# Load the SMO assembly and create a Server object
[System.Reflection.Assembly]::LoadWithPartialName('Microsoft.SqlServer.SMO') | out-null
$server = New-Object ('Microsoft.SqlServer.Management.Smo.Server') $serverInstance
# Set credentials
$server.ConnectionContext.LoginSecure=$false
$server.ConnectionContext.set_Login($credential.UserName)
$server.ConnectionContext.set_SecurePassword($credential.Password)
# Connect to the Server and get a few properties
$server.Information
First, the password has to be written to a file.
首先,必須將密碼寫入文件。
PS P:\> read-host -AsSecureString |ConvertFrom-SecureString |Out-File c:\SQLOnCentOS.txt
Second, the credentials are read from the file using PSCredential class. You don’t need to re-enter the password over and over again.
其次,使用PSCredential類從文件中讀取憑據。 您不需要一次又一次地輸入密碼。
# The Linux SQL instance IP address
$serverInstance = "10.2.6.62"
$User = 'sa'
# Convert plain text into a secure string
$User = 'sa'
$pass= cat c:\SQLOnCentOS.txt |ConvertTo-SecureString
#supply the $Pass variable as SecureString for the password
$Credentials = New-Object -TypeName System.Management.Automation.PSCredential -ArgumentList $User,$Pass
#Build the connection
$server = New-Object ('Microsoft.SqlServer.Management.Smo.Server') $serverInstance
# Set credentials
$server.ConnectionContext.LoginSecure=$false
$server.ConnectionContext.set_Login($credential.UserName)
$server.ConnectionContext.set_SecurePassword($credential.Password)
# Connect to the Server and get a few properties
$server.Information
Save the credentials as XML that can only be used on that computer with only your account.
將憑據另存為XML,僅在您的帳戶下只能在該計算機上使用。
Pop the credential dialog and input your credentials. This is a one-time thing.
彈出憑證對話框并輸入您的憑證。 這是一次性的事情。
Get-Credential | Export-Clixml \\Path\To\CredentialFile.xml
Now, make the script,
現在,制作腳本,
#record your credentials into the variable, $Credentials
$Credentials = Import-Clixml \\Path\To\CredentialFile.xml
#Build the connection
$server = New-Object ('Microsoft.SqlServer.Management.Smo.Server') $serverInstance
# Set credentials
$server.ConnectionContext.LoginSecure=$false
$server.ConnectionContext.set_Login($credential.UserName)
$server.ConnectionContext.set_SecurePassword($credential.Password)
# Connect to the Server and get a few properties
$server.Information
Backup
后備
Designing an effective backup and restore strategy requires careful planning, implementation, and testing. This section talks about using SQL Server Management Objects (SMO) to back up an SQL database hosted on a Linux Machine.
設計有效的備份和還原策略需要仔細的計劃,實施和測試。 本節討論使用SQL Server管理對象(SMO)備份Linux機器上托管SQL數據庫。
Let’s start this section by instantiating the SMO class library
讓我們從實例化SMO類庫開始
$server = New-Object ('Microsoft.SqlServer.Management.Smo.Server') $serverInstance
After connecting to the Linux SQL Instance, the properties of the databases can be listed using the below call:
連接到Linux SQL實例后,可以使用以下調用列出數據庫的屬性:
$server.Databases
The below call lists only the user-defined databases.
下面的調用僅列出用戶定義的數據庫。
$dbs = $server.Databases | where { $_.IsSystemObject -eq $False }
Prepare the backup file to back up the AdventureWorks database. The following code provides the metadata of the backup file and its backup directory location
準備備份文件以備份AdventureWorks數據庫。 以下代碼提供了備份文件的元數據及其備份目錄位置
????$backupDirectory='C:\var\opt\mssql\data' $dbName = 'AdventureWorks'$timestamp = Get-Date -format yyyy-MM-dd-HHmmss$targetPath = $backupDirectory + "\" + $dbName + "_" + $timestamp + ".bak"
Define the backup object that will be used for the database backup operation
定義將用于數據庫備份操作的備份對象
$smoBackup = New-Object ("Microsoft.SqlServer.Management.Smo.Backup")
Let’s retrieve the backup type information using an enumeration. The action property defines the type of backup.
讓我們使用枚舉檢索備份類型信息。 action屬性定義備份的類型。
PS P:\> [enum]::GetNames('Microsoft.SqlServer.Management.Smo.BackupActionType')
| Member name | Description |
| Database | Backs up all the data files in the database. |
| Files | Backs up specified data files. This option is recommended only when the transactions that have occurred since the last backup are isolated to the file or group of files that are being backed up. |
| Log | Backs up the transaction log. |
| 成員名字 | 描述 |
| 數據庫 | 備份數據庫中的所有數據文件。 |
| 檔案 | 備份指定的數據文件。 僅當自上次備份以來發生的事務隔離在要備份的文件或文件組中時,才建議使用此選項。 |
| 記錄 | 備份事務日志。 |
For a full backup, the Action property is set to a database, whereas for a differential backup, the Action property is set to a database along with having the incremental property set to $TRUE. For transaction log backup, on the other hand, we just change the Backup Action to Log.
對于完全備份,將Action屬性設置為數據庫,而對于差異備份,將Action屬性設置為數據庫,同時將遞增屬性設置為$ TRUE 。 另一方面,對于事務日志備份,我們只需將“備份操作”更改為“日志”。
# To perform the full backup??$smoBackup.Action = "Database"
# To turnoff??Differential backup???? $smoBackup.Incremental = $False
#Name of the database to backup$smoBackup.Database = $dbName
Specify the backup description so that we know what this backup is and when it was taken.
指定備份說明,以便我們知道該備份是什么以及何時進行備份。
????$smoBackup.BackupSetDescription = "Full Backup of " + $dbName$smoBackup.BackupSetName = $dbName + " Backup"$smoBackup.MediaDescription = "Disk"
We can configure what type of backup device is going to be used for the backup. In this case, it’s a file. To add a backup file to a device, use AddDevice() method.
我們可以配置將用于備份的備份設備類型。 在這種情況下,它是一個文件。 要將備份文件添加到設備,請使用AddDevice()方法。
PS P:\> [enum]::GetNames('Microsoft.SqlServer.Management.Smo.DeviceType')
| Member name | Description |
| File | Specifies a disk file. |
| LogicalDevice | Specifies a logical device. |
| Pipe | Specifies a named pipe. |
| Tape | Specifies a tape device. |
| Url | Specifies a URL. |
| VirtualDevice | Specifies a virtual device. |
| 成員名字 | 描述 |
| 文件 | 指定磁盤文件。 |
| 邏輯設備 | 指定邏輯設備。 |
| 管 | 指定命名管道。 |
| 膠帶 | 指定磁帶設備。 |
| 網址 | 指定一個URL。 |
| 虛擬設備 | 指定虛擬設備。 |
$smoBackup.Devices.AddDevice($targetPath, "File")
Now, the configuration is set; let’s initiate the database backup.
現在,配置已設置; 讓我們啟動數據庫備份。
$smoBackup.SqlBackup($server)
Let’s perform a dry run by combining all the pieces of above code:
讓我們結合以上所有代碼來進行一次試運行:
# The Linux SQL instance IP address
$serverInstance = "10.2.6.50"
# Backup directory of the SQL instance on Linux Machine
$backupDirectory='C:\var\opt\mssql\data'
#Define login credential
$User = 'sa'
$pass= cat c:\SQLOnCentOS.txt |ConvertTo-SecureString
$Credentials = New-Object -TypeName System.Management.Automation.PSCredential -ArgumentList $User,$Pass
#Load Assembly
[reflection.assembly]::Load("Microsoft.SqlServer.Smo, Version=13.0.0.0, Culture=neutral, PublicKeyToken=89845dcd8080cc91") | Out-NULL#Instantiate SQL Instance of Linux Machine$server = New-Object Microsoft.SqlServer.Management.Smo.Server -ArgumentList $serverInstance
# Set credentials
$server.ConnectionContext.LoginSecure=$false
$server.ConnectionContext.set_Login($credential.UserName)
$server.ConnectionContext.set_SecurePassword($credential.Password)# Connect to the Server and get a few properties of databases. The below code list only the user defined databases for backup
$dbs = $server.Databases | where { $_.IsSystemObject -eq $False }
#Looping through every databases$dbName = 'SQLShackDemo'$timestamp = Get-Date -format yyyy-MM-dd-HHmmss$targetPath = $backupDirectory + "\" + $dbName + "_" + $timestamp + ".bak"#Define the backup object that will be used for the database backup????$smoBackup = New-Object ("Microsoft.SqlServer.Management.Smo.Backup")
# To perform the full backup??$smoBackup.Action = "Database"
# To turnoff??Differential backup???? $smoBackup.Incremental = $False
#Specify the backup description so that we know what this backup is and when it was taken.$smoBackup.BackupSetDescription = "Full Backup of " + $dbName$smoBackup.BackupSetName = $dbName + " Backup"$smoBackup.Database = $dbName$smoBackup.MediaDescription = "Disk"# Add a backup device using AddDevice() method to a file.?? $smoBackup.Devices.AddDevice($targetPath, "File")#Initiate Database Backup$smoBackup.SqlBackup($server)
write-host "FULL back up $dbName ($serverName) to $targetPath"
That gives us the sample output like below:
這給了我們如下示例輸出:
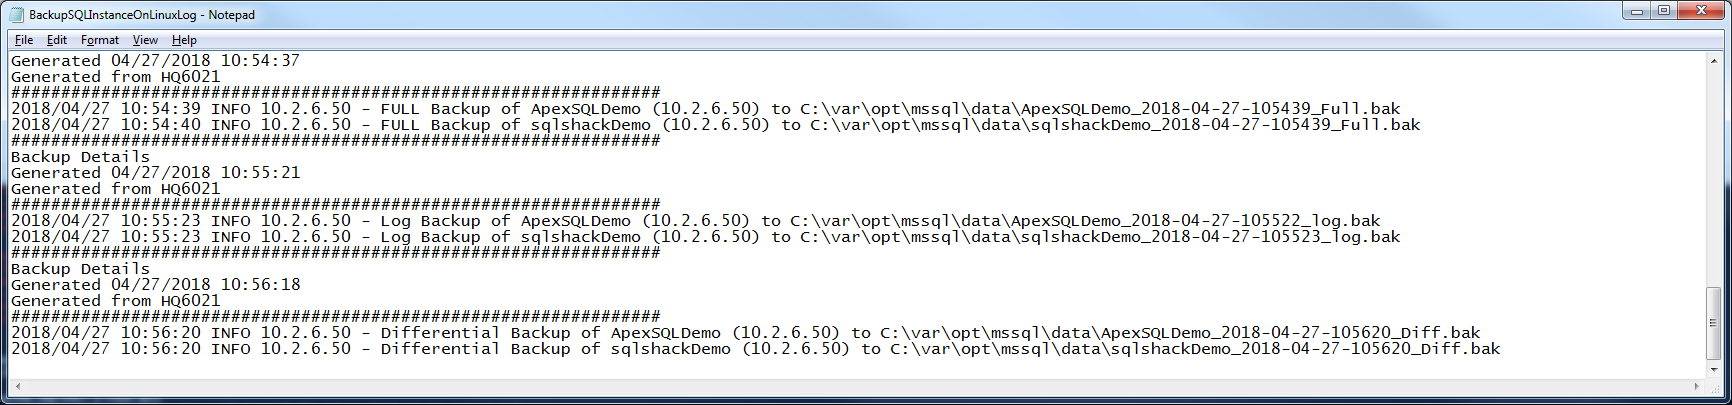
The following sample script can be used to back up a database with the following schedule:
以下示例腳本可用于按照以下時間表備份數據庫:
Every Sunday Evening at 10 PM – Full Backup
Every [Mon-Sat] Evening at 10 PM – Differential Backup
Every hour – Transaction Log
每個星期日晚上晚上10點–完全備份
每個[Mon-Sat]晚上晚上10點–差異備份
每小時–交易記錄
You can run the script on multiple Linux machines by passing the associated IP addresses as a parameter to the calling function Get-SQLinuxBackup. The same script can also be used to run backups for SQL instances on the Windows machines.
通過將關聯的IP地址作為參數傳遞給調用函數Get-SQLinuxBackup,可以在多臺Linux機器上運行腳本。 相同的腳本也可以用于在Windows計算機上為SQL實例運行備份。
Get-SQLinuxBackup -SQLServerInstance "10.2.6.50" -logfile??"C:\Backup\BackupSQLInstanceOnLinuxLog.txt"
Now, copy and save the PowerShell script as C:\BackupLinuxInstance.ps1.
現在,將PowerShell腳本復制并保存為C:\ BackupLinuxInstance.ps1。
In the script, it is necessary to make changes to the following variables
在腳本中,有必要對以下變量進行更改
<#
.SYNOPSIS Bakcup Automation for SQL Server 2107 databases on Linux machine using Task Scheduler and Powershell .DESCRIPTION A step by step details is discussed in the script 1. Load the new SQL Server Module2. Load SMO library3. Credential usage4. Define Backup strategy5. Inititate Backup.NOTES File Name??: get-SQLinuxBackupAuthor???? : Prashanth Jayaram ,sqlpowershell@gmail.comRequires?? : PowerShell V3 .EXAMPLE 1The first example - You can call the scriptC:\ PS> get-SQLinuxBackup -SQLServerInstance '10.2.6.62' -logfile?? .EXAMPLE 2Set-WriteLog??-Message "$($_.Server) is reachable and starting the process " -Logfile $Logfile.PARAMETER 1SQLServerInstance -?? This is the IP address of the Linux instance.PARAMETER 2logfile -?? This is write the progress of the script#> FUNCTION Get-SQLinuxBackup{[CmdletBinding(SupportsShouldProcess=$true,ConfirmImpact='Low')]Param([Parameter(Mandatory=$true,Position=0)][String]$SQLServerInstance,[Parameter(Mandatory=$true,Position=1)][String]$Logfile)# Prepare headers for the log file for each execution of scriptAdd-Content $logfile "#################################################################"
Add-Content $logfile "Backup Details"
Add-Content $logfile "Generated $(get-date)"
Add-Content $logfile "Generated from $(gc env:computername)"
Add-Content $logfile "#################################################################"Function Set-WriteLog {[CmdletBinding()]Param([Parameter(Mandatory=$False)][ValidateSet("INFO","WARN","ERROR")][String]$Level = "INFO",[Parameter(Mandatory=$True)][string]$Message,[Parameter(Mandatory=$False)][string]$logfile)$Stamp = (Get-Date).toString("yyyy/MM/dd HH:mm:ss")$Line = "$Stamp $Level $Message"If($logfile) {Add-Content $logfile -Value $Line}Else {Write-Output $Line}
}# Import sqlserver module Import-Module sqlserver -DisableNameChecking# set the backup directory$backupDirectory='C:\var\opt\mssql\data'# the credentials are hardcoded$User = 'sa'
$Pass = ConvertTo-SecureString 'thanVitha@2015' -AsPlainText -Force$Credential = New-Object -TypeName System.Management.Automation.PSCredential -ArgumentList $User,$Pass# load the assembly[reflection.assembly]::Load("Microsoft.SqlServer.Smo, Version=13.0.0.0, Culture=neutral, PublicKeyToken=89845dcd8080cc91") | Out-NULL# declare the SMO isntance of given SQL Server$server = New-Object ('Microsoft.SqlServer.Management.Smo.Server') $SQLServerInstance
# Set credentials
$server.ConnectionContext.LoginSecure=$false
$server.ConnectionContext.set_Login($credential.UserName)
$server.ConnectionContext.set_SecurePassword($credential.Password)# listing the user defined databases$dbs = $server.Databases | where { $_.IsSystemObject -eq $False }# backup start data and time$BackupStartTime = get-date
$timestamp = Get-Date -format yyyy-MM-dd-HHmmss# Full Backup should start on or after 10 PM on every Sunday and daily on or after 9 PM differential backup should startif ($BackupStartTime.Hour -eq 10)
{if ($BackupStartTime.DayOfWeek -eq "Sunday"){foreach ($database in $dbs)??{$dbName = $database.Name$targetPath = $backupDirectory + "\" + $dbName + "_" + $timestamp +"_Full"+ ".bak"$smoBackup = New-Object ("Microsoft.SqlServer.Management.Smo.Backup")$smoBackup.Action = "Database"$smoBackup.BackupSetDescription = "Full Backup of " + $dbName$smoBackup.BackupSetName = $dbName + " Backup"$smoBackup.Database = $dbName$smoBackup.MediaDescription = "Disk"$smoBackup.Devices.AddDevice($targetPath, "File")$smoBackup.SqlBackup($server)Set-WriteLog??-Message "$SQLServerInstance - FULL Backup of $dbName ($SQLServerInstance) to $targetPath"??-Logfile $Logfile}}else{foreach ($database in $dbs)??{$dbName = $database.Name$targetPath = $backupDirectory + "\" + $dbName + "_" + $timestamp +"_Diff"+ ".bak"$smoBackup = New-Object ("Microsoft.SqlServer.Management.Smo.Backup")$smoBackup.Incremental = $true$smoBackup.Action = 1$smoBackup.BackupSetDescription = "Differential Backup of " + $dbName$smoBackup.BackupSetName = $dbName + " Backup"$smoBackup.Database = $dbName$smoBackup.MediaDescription = "Disk"$smoBackup.Devices.AddDevice($targetPath, "File")$smoBackup.SqlBackup($server)Set-WriteLog??-Message "$SQLServerInstance - Differential Backup of $dbName ($SQLServerInstance) to $targetPath"??-Logfile $Logfile} }
}
else
{$dbs = $server.Databases | where { $_.IsSystemObject -eq $False -and $_.RecoveryModel??-ne 3}foreach ($database in $dbs)??
{$dbName = $database.Name$timestamp = Get-Date -format yyyy-MM-dd-HHmmss$targetPath = $backupDirectory + "\" + $dbName + "_" + $timestamp??+"_log"+".bak"$smoBackup = New-Object ("Microsoft.SqlServer.Management.Smo.Backup")$smoBackup.Action = "Log"$smoBackup.BackupSetDescription = "Log Backup of " + $dbName$smoBackup.BackupSetName = $dbName + " Backup"$smoBackup.Database = $dbName$smoBackup.MediaDescription = "Disk"$smoBackup.Devices.AddDevice($targetPath, "File")$smoBackup.SqlBackup($server)Set-WriteLog??-Message "$SQLServerInstance - Log Backup of $dbName ($SQLServerInstance) to $targetPath"??-Logfile $Logfile}}
}# function callingGet-SQLinuxBackup -SQLServerInstance "10.2.6.50" -logfile??"C:\Backup\BackupSQLInstanceOnLinuxLog.txt"
Task Scheduler?
任務計劃程序
How to create an event using the?Task Scheduler:
如何使用任務計劃程序創建事件:
As per the screenshot, I saved the file under C:\BackupJob_SQL2017_Linux.PS1. Therefore, in the add arguments text box, I entered: C:\ BackupJob_SQL2017_Linux.PS1;exit
根據屏幕快照,我將文件保存在C:\ BackupJob_SQL2017_Linux.PS1下。 因此,在添加參數文本框中,我輸入: C:\ BackupJob_SQL2017_Linux.PS1; exit
That completes the guide to creating a backup of a database hosted on a Linux machine.
這就完成了創建Linux機器上托管的數據庫備份的指南。
| Database Backup and Restore process in SQL Server – series intro |
| An overview of the process of SQL Server backup-and-restore |
| Understanding the SQL Server Data Management Life Cycle |
| Understanding SQL Server database recovery models |
| Understanding SQL Server Backup Types |
| Backup and Restore (or Recovery) strategies for SQL Server database |
| Discussing Backup and Restore Automation using SQLCMD and SQL Server agent |
| Understanding Database snapshots vs Database backups in SQL Server |
| SqlPackage.exe – Automate SQL Server Database Restoration using bacpac with PowerShell or Batch techniques |
| Smart database backup in SQL Server 2017 |
| How to perform a Page Level Restore in SQL Server |
| Backup Linux SQL Server databases using PowerShell and Windows task scheduler |
| SQL Server Database backup and restore operations using the Cloud |
| Tail-Log Backup and Restore in SQL Server |
| SQL Server Database Backup and Restore reports |
| Database Filegroup(s) and Piecemeal restores in SQL Server |
| In-Memory Optimized database backup and restore in SQL Server |
| Understanding Backup and Restore operations in SQL Server Docker Containers |
| Backup and Restore operations with SQL Server 2017 on Docker containers using Azure Data Studio |
| Interview questions on SQL Server database backups, restores and recovery – Part I |
| Interview questions on SQL Server database backups, restores and recovery – Part II |
| Interview questions on SQL Server database backups, restores and recovery – Part III |
| Interview questions on SQL Server database backups, restores and recovery – Part IV |
| SQL Server中的數據庫備份和還原過程–系列簡介 |
| SQL Server備份和還原過程概述 |
| 了解SQL Server數據管理生命周期 |
| 了解SQL Server數據庫恢復模型 |
| 了解SQL Server備份類型 |
| SQL Server數據庫的備份和還原(或恢復)策略 |
| 討論使用SQLCMD和SQL Server代理進行備份和還原自動化 |
| 了解SQL Server中的數據庫快照與數據庫備份 |
| SqlPackage.exe –使用bacpac和PowerShell或Batch技術自動執行SQL Server數據庫還原 |
| SQL Server 2017中的智能數據庫備份 |
| 如何在SQL Server中執行頁面級還原 |
| 使用PowerShell和Windows任務計劃程序備份Linux SQL Server數據庫 |
| 使用CloudSQL Server數據庫備份和還原操作 |
| SQL Server中的尾日志備份和還原 |
| SQL Server數據庫備份和還原報告 |
| SQL Server中的數據庫文件組和零碎還原 |
| 在SQL Server中進行內存優化的數據庫備份和還原 |
| 了解SQL Server Docker容器中的備份和還原操作 |
| 使用Azure Data Studio在Docker容器上使用SQL Server 2017進行備份和還原操作 |
| 有關SQL Server數據庫備份,還原和恢復的面試問題–第一部分 |
| 有關SQL Server數據庫備份,還原和恢復的面試問題–第二部分 |
| 有關SQL Server數據庫備份,還原和恢復的面試問題–第三部分 |
| 有關SQL Server數據庫備份,還原和恢復的面試問題–第IV部分 |
翻譯自: https://www.sqlshack.com/backup-linux-sql-server-databases-using-powershell-and-windows-task-scheduler/
版权声明:本站所有资料均为网友推荐收集整理而来,仅供学习和研究交流使用。

工作时间:8:00-18:00
客服电话
电子邮件
admin@qq.com
扫码二维码
获取最新动态


