Win10+Python+Django+Nginx+MySQL開發教程及實例
PaulTsao
本系列教程共有四篇內容:
php教程,第一篇: 開發環境搭建
第二篇:用Python連通操作MySQL
第三篇:用Nginx運行html網頁
第四篇*:創建個人博客
第五篇*:個人博客網站上云部署并運行
?
?第二篇:Win10+Python+Django+Nginx+MySQL?開發環境,用Python連通操作MySQL?
前提:開發環境已經如前文所述搭建正確。
理論方法:python連接mysql常用的庫如下
1,mysql-python也就是MySQLdb;
2,PyMySQL。支持jython,IronPython,CPython等;
3,MySQL Connector/Python。純python實現的MySQL接口,由Oracle維護;
?實現方法:采用第一種方法庫實現。
(1)安裝MySQL-python-1.2.5
?安裝步驟如下:
?1)管理員身份運行CMD或Power Shell,進入D:\MySQL-python-1.2.5
cd D:\MySQL-python-1.2.5 # 進入 MySQL-python-1.2.5 目錄python setup.py install # 執行安裝命令?報錯如下:
_mysql.c(42) : fatal error C1083: Cannot open include file: 'config-win.h': No such file or directory
error: command 'C:\\Users\\apollo\\AppData\\Local\\Programs\\Common\\Microsoft\\Visual C++ for Python\\9.0\\VC\\Bin\\cl.exe' failed with exit status 2
?2)遂安裝 Microsoft Visual C++ Compiler Package for Python 2.7 ,查詢MS官網VCForPython27.msi有說明如下:
?“The compiler package will default to installing just for the current user and does not require administrative privileges. To install for all users of a machine, execute msiexec /i <path to MSI> ALLUSERS=1 from an elevated Command Prompt.”
?故以管理員身份“本機全用戶”安裝,如下:
PS C:\WINDOWS\system32> cd D:\MySQL-python-1.2.5PS D:\MySQL-python-1.2.5> msiexec /i VCForPython27.msi ALLUSERS=1安裝路徑不可選,默認安裝的路徑為:
C:\Users\apollo\AppData\Local\Programs\Common\Microsoft\Visual C++ for Python\9.0\VC\Bin
并將此路徑添加到系統環境變量,避免無法調用或報錯。
提示:這個還有其他安裝方法:
a).exe文件格式
MySQL-python-1.2.5.win32-py2.7.exe #雙擊,下一步安裝,安裝路徑不可選b).zip壓縮文件格式
管理員身份運行CMD或Power Shell,進入解壓后文件所在目錄,如D:\MySQL-python-1.2.5
cd D:\MySQL-python-1.2.5 # 進入 MySQL-python-1.2.5 目錄python setup.py install # 執行安裝
3)安裝 MySQL Connector C 6.0.2
后來又通過資料和驗證得知,這個是必須要安裝的,不然也不行。
mysql-connector-c-6.0.2-win32.msi # 雙擊安裝,安裝路徑不可選
默認安裝的路徑為:
?C:\Program Files\MySQL\MySQL Connector C 6.0.2\bin
?同時,將此路徑添加到系統環境變量,以避免無法調用或報錯。
?4)修改MySQL-python-1.2.5的配置文件site.cfg
?這里是另一處報錯常出現的地方。
?實際上,如果是在32 位系統上部署,那么pip install 安裝MySQL-python 1.2.5 ,只需進行上面的依賴包安裝即可。這在Python3.x上很方便。但是你會發現Python2.7中貌似不行。
?那么修改 site.cfg 文件或可解決。? 因為在 64 位系統中,有Program Files (x86)和Program Files 這兩個文件。有可能會提示“Cannot open include file: 'config-win.h'” 的錯誤。 原因就是 site.cfg 中寫的 MySQL Connector C 為32 位版本或者系統依賴的路徑是Program Files 。
?原來的 site.cfg 文件內容如下:
?# http://stackoverflow.com/questions/1972259/mysql-python-install-problem-using-virtualenv-windows-pip
# Windows connector libs for MySQL. You need a 32-bit connector for your 32-bit Python build.
connector = C:\Program Files (x86)\MySQL\MySQL Connector C 6.0.2
?將其(x86)去掉,即可:
?connector = C:\Program Files\MySQL\MySQL Connector C 6.0.2
?(2)檢驗Python到MySQL是否連通
?檢驗1:
?進入Python ,輸入以下代碼:
?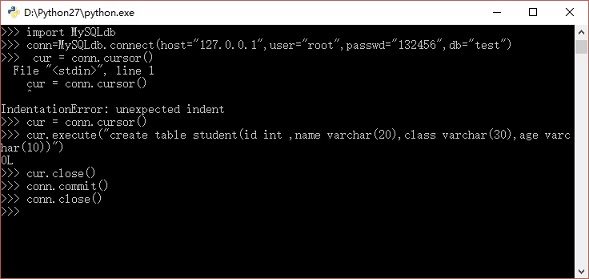
#coding=utf-8import MySQLdbconn= MySQLdb.connect(host='localhost',user='root',passwd='132456',db ='test',)cur = conn.cursor() #在test數據庫中創建數據表studentcur.execute("create table student(id int ,name varchar(20),class varchar(30),age varchar(10))")cur.close()conn.commit()conn.close()
?
?查驗結果:
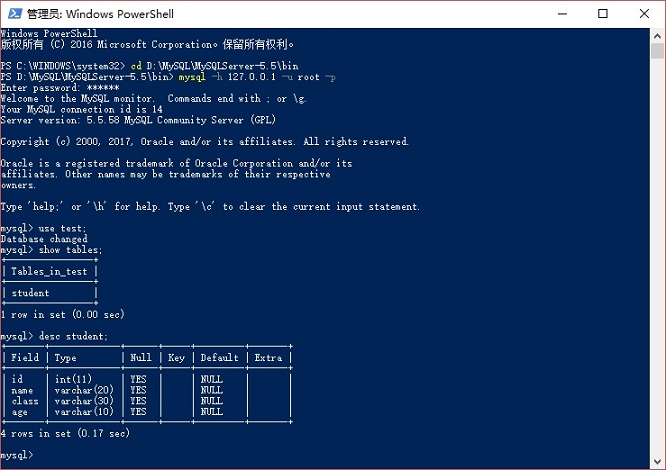
?以管理員身份打開PowerShell或CMD,進入MySQL:
PS C:\WINDOWS\system32> cd D:\MySQL\MySQLServer-5.5\bin
PS D:\MySQL\MySQLServer-5.5\bin> mysql  -u root -p
Enter password: 132456
分步輸入以下命令:
mysql> use test;Database changedmysql> show tables;+----------------+| Tables_in_test |+----------------+| student |+----------------+1 row in set (0.00 sec)mysql> desc student; # 顯示student表結構+-------+-------------+----| Field | Type | Nul+-------+-------------+----| id | int(11) | YES| name | varchar(20) | YES| class | varchar(30) | YES| age | varchar(10) | YES+-------+-------------+----4 rows in set (0.17 sec)?如下圖:
?
顯示結果表明:
?Test數據庫中已添加student表,并且表結構與我們設計的一致。表示Python連通操作MySQL成功。
檢驗2:
?連接MySQL,逐行輸入以下Python代碼。
# -*- coding: utf8 -*-import MySQLdbconn=MySQLdb.connect(host='localhost',user='root',passwd='1',db='test')cursor = conn.cursor()cursor.execute ("SELECT VERSION()")row = cursor.fetchone ()print "server version:", row[0]cursor.close()conn.close()
?輸出:
server version: 5.5.58?說明:Win10下Python連通MySQL正確。
作者信息:
PaulTsao
Github: github.com/apollocaoy
Linkedin:www.limkedin.com/apollocaoy
E-mail:apollocaoy@foxmail.com