@SpringBootApplication注解相当于@SpringBootConfiguration、@EnableAutoConfiguration和@ComponentScan等多个注解的功能。
我们挨个分析其中的功能。
我们先点进去看其源码
@SpringBootConfiguration
@EnableAutoConfiguration
@ComponentScan(excludeFilters = {@Filter(type = FilterType.CUSTOM,classes = {TypeExcludeFilter.class}
), @Filter(type = FilterType.CUSTOM,classes = {AutoConfigurationExcludeFilter.class}
)}
)
public @interface SpringBootApplication()
@SpringBootApplication它是上面这些注解的合成注解,我们首先分析第一个
自动配置、点进去我们发现
@Configuration
public @interface SpringBootConfiguration
它就是一个@configuration
@configuration。代表当前是一个配置类。说明我们main程序也是springboot中的一个配置类。它是一个核心配置类。
它是一个包扫描器,指定我们要扫描哪些包
boot原理、这是最重要的一个注解,我们点进去看
@AutoConfigurationPackage
@Import({AutoConfigurationImportSelector.class})
public @interface EnableAutoConfiguration
发现它是一个合成注解。
自动配置包,指定默认的包规则
翻译过来是自动配置包,进入源码,可以看到
@Import({Registrar.class})
public @interface AutoConfigurationPackage
springboot运行原理。它实际上就是给容器中导入一个组件,这个组件是Registrar.class,我们再进去看看这个Registrar
static class Registrar implements ImportBeanDefinitionRegistrar, DeterminableImports {Registrar() {}public void registerBeanDefinitions(AnnotationMetadata metadata, BeanDefinitionRegistry registry) {AutoConfigurationPackages.register(registry, (String[])(new AutoConfigurationPackages.PackageImports(metadata)).getPackageNames().toArray(new String[0]));}public Set<Object> determineImports(AnnotationMetadata metadata) {return Collections.singleton(new AutoConfigurationPackages.PackageImports(metadata));}}
它是一个静态内部类,有两个方法。我们利用Registrar 给容器中批量注册组件,即导入一系列组件。
这里面registerBeanDefinitions传了两个参数,AnnotationMetadata 相当于注解的元信息,而注解指的就是AutoConfigurationPackage 。注解的元信息代表注解标在哪里,每一个属性的值是多少。能看到标在MainApplication上。

(String[])(new AutoConfigurationPackages.PackageImports(metadata)).getPackageNames().toArray(new String[0])相当于把注解元信息拿来,获取到包名,这个包名是com.yujie.boot(主程序所在的)。然后把这个包名封装到数组里面。然后给我们注册进去。这个 register就是把我们包下的所有组件注册进去。
将指定的一个包下的所有组件导入进来,MainApplication所在的包。
点进去
public String[] selectImports(AnnotationMetadata annotationMetadata) {if (!this.isEnabled(annotationMetadata)) {return NO_IMPORTS;} else {AutoConfigurationImportSelector.AutoConfigurationEntry autoConfigurationEntry = this.getAutoConfigurationEntry(annotationMetadata);return StringUtils.toStringArray(autoConfigurationEntry.getConfigurations());}}
Springboot自动装配。这个方法指示了我们要给容器导入哪些,在这个数组里面规定的。通过调用getAutoConfigurationEntry得到的所有的配置组件等信息。
即通过getAutoConfigurationEntry方法批量导入一些组件。
protected AutoConfigurationImportSelector.AutoConfigurationEntry getAutoConfigurationEntry(AnnotationMetadata annotationMetadata) {if (!this.isEnabled(annotationMetadata)) {return EMPTY_ENTRY;} else {AnnotationAttributes attributes = this.getAttributes(annotationMetadata);//获取所有候选配置getCandidateConfigurationsList<String> configurations = this.getCandidateConfigurations(annotationMetadata, attributes);configurations = this.removeDuplicates(configurations);Set<String> exclusions = this.getExclusions(annotationMetadata, attributes);this.checkExcludedClasses(configurations, exclusions);configurations.removeAll(exclusions);configurations = this.getConfigurationClassFilter().filter(configurations);this.fireAutoConfigurationImportEvents(configurations, exclusions);return new AutoConfigurationImportSelector.AutoConfigurationEntry(configurations, exclusions);}}
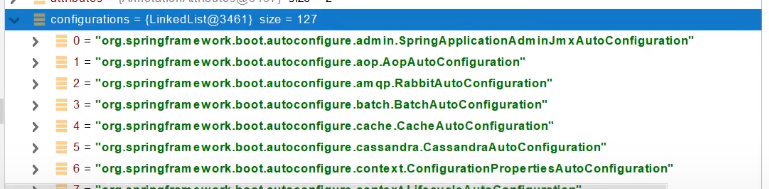
可以看到getAutoConfigurationEntry最后返回了configuration对象,configuration返回了127个组件,它们默认要导入到容器中。
调用List< String > configurations = this.getCandidateConfigurations(annotationMetadata, attributes);获取到所有需要导入到容器中的配置类
然后利用工厂加载Map<String,List< String >> loadSpringFactories(@Nullable ClassLoader classLoader)得到所有的组件。
从META-INF/spring.factories位置来加载一个文件
默认扫描我们当前系统里面所有META-INF/spring.factories位置的文件。
spring-boot-autoconfigure-2.3.5.RELEASE.jar包里面也有指定的文件META-INF/spring.factories。
然后我们看看里面的内容:

我们可以看到EnableAutoConfiguration.跟我们注解是一样类名的,在下面都是xxxAutoConfiguration.全场景的自动配置都在这里面列举出来了。
文件里面写死了spring-boot已启动就要给容器中加载的所有配置类
Spring boot,虽然127个场景的所有自动配置启动时默认全部加载,最终会按需配置。


可以看到,这里面的aop功能不能实现,因为这里有ConditionOnClass,只要我们类路径里面存在这个Advice这个类,后面的内容才会生效。那什么时候才会生效呢,只有导入下面的包,才会生效

批处理也无法生效

虽然说一股脑的加载了所有,但是最终得益于条件装配,很多并不能完全开启。
启动时加载所有场景,最终按照条件装配规则按需配置。
我们仍然来看一下AopAutoConfiguration这个类。来看aop的自动配置功能能否生效。
127个组件中包含aop
看到aop类上面的两个注解
@Configuration(proxyBeanMethods = false)
@ConditionalOnProperty(prefix = "spring.aop", name = "auto", havingValue = "true", matchIfMissing = true)
ConditionalOnProperty意思就是判断配置文件中是否存在spring.aop.auto这个配置,并且它的值是true,下面的值就生效。
下面有两个注解和一个内部类
@Configuration(proxyBeanMethods = false)@ConditionalOnClass(Advice.class)static class AspectJAutoProxyingConfiguration
Springboot项目、ConditionalOnClass应用里面是否存在Advice这个类。这个Advice是import org.aspectj.weaver.Advice;里面的Advice。因为我们没有导入aop的应用场景,所有aspectj没有导入进来,相当于这个自动配置类没有生效。
而我们在往下面的看的时候,又有一个内部类和它的注解
@Configuration(proxyBeanMethods = false)@ConditionalOnMissingClass("org.aspectj.weaver.Advice")@ConditionalOnProperty(prefix = "spring.aop", name = "proxy-target-class", havingValue = "true",matchIfMissing = true)static class ClassProxyingConfiguration
可以看到没有org.aspectj.weaver.Advice这个类的时候,它就会生效。并且下面的配置了spring.aop,proxy-target-class以及值为true的时候生效,但是后面matchIfMissing = true告诉我们,没配也算做配了。相当于也是默认开启了aop功能,当然是简单的aop功能。即有些东西在某些条件下能够生效,有的不能生效。
由于我们k开发的是web应用,所以与web相关的应该生效了。因此我们再来看一看DispatcherServletAutoConfiguration
@AutoConfigureOrder(Ordered.HIGHEST_PRECEDENCE)
@Configuration(proxyBeanMethods = false)				//说明是配置类
@ConditionalOnWebApplication(type = Type.SERVLET)
@ConditionalOnClass(DispatcherServlet.class)
@AutoConfigureAfter(ServletWebServerFactoryAutoConfiguration.class)
public class DispatcherServletAutoConfiguration
@ConditionalOnWebApplication(type = Type.SERVLET)判断当前是不是web应用,而且必须是原生的Servlet。
@ConditionalOnClass(DispatcherServlet.class)判断当前系统有没有导入DispatcherServlet类,它是springmvc包下的。
@AutoConfigureAfter(ServletWebServerFactoryAutoConfiguration.class)这里的after指在…之后,也就是在ServletWebServerFactoryAutoConfiguration配置完之后再生效。即在它配置完之后再配置DispatcherServlet
然后再分析内部类
@Configuration(proxyBeanMethods = false)
@Conditional(DefaultDispatcherServletCondition.class)
@ConditionalOnClass(ServletRegistration.class)
@EnableConfigurationProperties(WebMvcProperties.class)
protected static class DispatcherServletConfiguration
@EnableConfigurationProperties(WebMvcProperties.class),有两个功能。1.它可以开启WebMvcProperties类与配置文件的绑定功能。而WebMvcProperties与配置文件中的spring.mvc开始的所有属性进行一一对应绑定。2.把WebMvcProperties放入到容器中。

我们可以看看DispatcherServletConfiguration类里面的内容
@Bean(name = DEFAULT_DISPATCHER_SERVLET_BEAN_NAME)public DispatcherServlet dispatcherServlet(WebMvcProperties webMvcProperties) {DispatcherServlet dispatcherServlet = new DispatcherServlet();dispatcherServlet.setDispatchOptionsRequest(webMvcProperties.isDispatchOptionsRequest());dispatcherServlet.setDispatchTraceRequest(webMvcProperties.isDispatchTraceRequest());dispatcherServlet.setThrowExceptionIfNoHandlerFound(webMvcProperties.isThrowExceptionIfNoHandlerFound());dispatcherServlet.setPublishEvents(webMvcProperties.isPublishRequestHandledEvents());dispatcherServlet.setEnableLoggingRequestDetails(webMvcProperties.isLogRequestDetails());return dispatcherServlet;
@Bean给容器中注册这个类型的组件,它new了一个dispatcherServlet,然后配置,并且返回出去。
@ConditionalOnBean(MultipartResolver.class)			//容器中有这个类型组件
@ConditionalOnMissingBean(name = DispatcherServlet.MULTIPART_RESOLVER_BEAN_NAME)
//容器中没有这个名字multipartResolver
public MultipartResolver multipartResolver(MultipartResolver resolver) {
//给@Bean标注的方法传入了对象参数,这个参数的值就会从容器中找
//springmvc multipartResolver,防止有些用户配置的文件上传解析器不符合规范。// Detect if the user has created a MultipartResolver but named it incorrectlyreturn resolver;
}
给容器中加入了文件上传解析器。
HttpEncodingAutoConfiguration是HTTP编码自动配置。输入中文可以不用配置。不会乱码,里面配置过CharacterEncoding了。
以DispatcherServletAutoConfiguration的内部类DispatcherServletConfiguration为例子:
@Bean
@ConditionalOnBean(MultipartResolver.class)  //容器中有这个类型组件
@ConditionalOnMissingBean(name = DispatcherServlet.MULTIPART_RESOLVER_BEAN_NAME) //容器中没有这个名字 multipartResolver 的组件
public MultipartResolver multipartResolver(MultipartResolver resolver) {//给@Bean标注的方法传入了对象参数,这个参数的值就会从容器中找。//SpringMVC multipartResolver。防止有些用户配置的文件上传解析器不符合规范// Detect if the user has created a MultipartResolver but named it incorrectlyreturn resolver;//给容器中加入了文件上传解析器;
}
SpringBoot默认会在底层配好所有的组件,但是如果用户自己配置了以用户的优先。
SpringBoot先加载所有的自动配置类 xxxxxAutoConfiguration
每个自动配置类按照条件进行生效,默认都会绑定配置文件指定的值。(xxxxProperties里面读取,xxxProperties和配置文件进行了绑定)
生效的配置类就会给容器中装配很多组件
只要容器中有这些组件,相当于这些功能就有了
只要用户有自己配置的,就以用户优先。
定制化配置两种办法
1.用户直接自己@Bean替换底层的组件
2.用户去看这个组件是获取的配置文件什么值就去修改。
xxxxxAutoConfiguration —> 组件 —> xxxxProperties里面拿值 ----> application.properties
只要能该springboot的配置文件了,就可以整合出自己想要的场景。
配置文件如何改。
查询相关文档
https://docs.spring.io/spring-boot/docs/2.2.13.RELEASE/reference/html/appendix-application-properties.html#common-application-properties

2.在底层找注解。
引入场景依赖
查看有哪些starter

查看自动配置了哪些
可以不用关心,当然也可以自己分析。查看其jar包。,引入场景对应的配置一般都生效了。
我们也可以在application.properties中加入debug=true

它会自动列举出哪些自动配置类生效了,哪些没有生效。也即配置文件中debug=true开启自动配置报告,Negative不生效,positive生效。
即配置
是否需要修改
参照文档修改配置项
自定义加入或者替换组件。xxxProperties绑定了配置文件的哪些
@Bean,@Component
自定义器 xxxxCustomizer
上传了一张图片
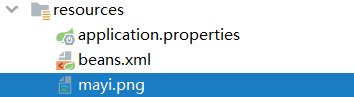

在文档中我们可以看到,这里就是设置banner的,默认是找类路径下的banner.gif。如果没有这样的图片,我们就在配置文件中自己设置

在application.properties中
spring.banner.image.location=classpath:mayi.png
运行起来,可以看到

简化Javabean的开发
我们之前开发的时候,要给Javabean写get,set方法,toString方法,还有有参无参构造函数,但是有了lombok之后,就可以简化我们的开发。
我们在pom.xml文件中往spring-boot-dependencies中找到的lombok版本是

第一步,引入lombok依赖
<dependency><groupId>org.projectlombok</groupId><artifactId>lombok</artifactId>
</dependency>
第二步:安装插件

第三步:使用Lombok的
@Data注解生成get、set方法
@ToString注解生成toString方法
@AllArfgsConstructor生成有参构造方法
@NoArfgsConstructor生成有参构造方法
@EqualsAndHashCode生成equals或者hashcode方法
注意,它是在编译阶段生成,而不是在源代码中生成,这样源代码看起来就很简洁。
示例,User类,其他Car类和Pet类也类似。
@NoArgsConstructor
@AllArgsConstructor
@Data
@ToString
@EqualsAndHashCode
public class User {public String name;public int age;public Pet pet;//特殊构造函数可以自己定义public User(String name, int age) {this.name = name;this.age = age;}
}
HelloController中的内容。这里面可以使用lombok提供的@Slf4j的注解,可以查看日志信息
@Slf4j
@RestController
public class HelloController {@AutowiredCar car;@RequestMapping("/car")public Car car(){return car;}/*这里表示请求的路径是/hello*/@RequestMapping("/hello")public String handle01(){log.info("请求进来了...");return "hello,Spring Boot 2";}
}
浏览器输入http://localhost:8888/hello

它的作用就是对于前端使用模板引擎的项目,能够自动禁用缓存,在页面修改后,只需要刷新浏览器器页面即可。 即热更新。也就是我们不用重启整个项目。当我们对项目代码进行修改了之后,按住Ctrl+F9就可以实时生效。
引入依赖
<dependency><groupId>org.springframework.boot</groupId><artifactId>spring-boot-devtools</artifactId><optional>true</optional></dependency>
我们启动一下项目,然后把下面的hello改成hello2,然后不重启项目,直接刷新一下,再访问hello看一下效果。
@RequestMapping("/hello")public String handle01()

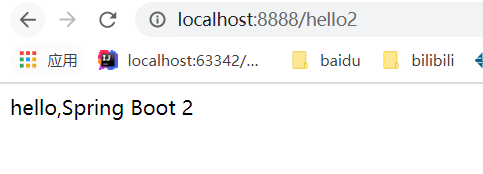
可以看到,访问hello2即可成功。
实际上,它在内部还是restart的过程。
Spring Initailizr是创建Spring Boot工程向导。可以快速创建springboot应用


下面我们想要什么功能,我们就选什么组件,在这里我选了SpringWeb、MybatisFramework、SpringDataRedis,版本这里选择2.3.7

最后next和Finish即可。
进去之后,删除不必要的文件

最后帮我们引入了依赖
<dependencies><dependency><groupId>org.springframework.boot</groupId><artifactId>spring-boot-starter-data-redis</artifactId></dependency><dependency><groupId>org.springframework.boot</groupId><artifactId>spring-boot-starter-web</artifactId></dependency><dependency><groupId>org.mybatis.spring.boot</groupId><artifactId>mybatis-spring-boot-starter</artifactId><version>2.1.4</version></dependency><dependency><groupId>org.springframework.boot</groupId><artifactId>spring-boot-starter-test</artifactId><scope>test</scope><exclusions><exclusion><groupId>org.junit.vintage</groupId><artifactId>junit-vintage-engine</artifactId></exclusion></exclusions></dependency></dependencies>
也帮我们搭建了整个项目的框架,如静态资源、页面目录,项目的启动类和配置文件。

版权声明:本站所有资料均为网友推荐收集整理而来,仅供学习和研究交流使用。

工作时间:8:00-18:00
客服电话
电子邮件
admin@qq.com
扫码二维码
获取最新动态