配置iscsi服務器
windows iscsi配置, In this article, I am going to explain how we can install and configure the iSCSI Target Server Role on Windows Server 2016. iSCSI stands for Internet Small Computer System Interface and iSCSI Target Server allows you to boot multiple computers from a single operating system (OS) image.
在本文中,我將解釋如何在Windows Server 2016上安裝和配置iSCSI Target服務器角色。iSCSI代表Internet小型計算機系統接口,iSCSI Target Server允許您從單個操作系統(OS)引導多臺計算機。 ) 圖片。
To demonstrate the deployment process, I have created two virtual machines on my workstation. I have installed Windows Server 2016 on the virtual machines. Following is the configuration of the virtual machines.
為了演示部署過程,我在工作站上創建了兩個虛擬機。 我已在虛擬機上安裝Windows Server 2016 。 以下是虛擬機的配置。
| Host Name | IP Address | Operating System | Role |
| DC.Local | 192.168.0.100 | Windows Server 2016 | iSCSI initiator |
| SAN.Dc.Local | 192.168.0.130 | Windows Server 2016 | iSCSI Target Server |
主機名 | IP地址 | 操作系統 | 角色 |
DC本地 | 192.168.0.100 | Windows Server 2016 | iSCSI啟動器 |
SAN.Dc.Local | 192.168.0.130 | Windows Server 2016 | iSCSI目標服務器 |
First, let us create an iSCSI server. To do that, we must install the iSCSI server role.
首先,讓我們創建一個iSCSI服務器。 為此,我們必須安裝iSCSI服務器角色。
To configure the iSCSI target server, we must install the “File and iSCSI Services” role in Windows Server. To do that, Open Server Manager and click on “Manage” and select “Add roles and features.” See the following image.
要配置iSCSI目標服務器,我們必須在Windows Server中安裝“ File and iSCSI Services ”角色。 為此,請打開服務器管理器 ,然后單擊“ 管理 ”,然后選擇“ 添加角色和功能”。 ”參見下圖。
On Add Roles and Features Wizard screen, you can see the detailed information about the wizard. We can skip this screen by checking on “Skip this page by default” checkbox. Click Next. See the following image:
在“ 添加角色和功能向導”屏幕上 ,您可以看到有關該向導的詳細信息。 我們可以通過選中“ 默認情況下跳過此頁面 ”復選框來跳過此屏幕。 單擊下一步 。 見下圖:
On Select Installation Type screen, you can choose to install a role on a dedicated computer or install a role on a virtual hard disk. We want to install the iSCSI service on a virtual machine; therefore, choose “Role-based or feature-based installation” Click on Next. See the following image:
在“選擇安裝類型”屏幕上,您可以選擇在專用計算機上安裝角色或在虛擬硬盤上安裝角色。 我們要在虛擬機上安裝iSCSI服務。 因此,選擇“ 基于角色或基于功能的安裝 ”, 然后單擊“ 下一步”。 見下圖:
On the “Select destination server” screen, we can choose the server or the virtual disk on which we want to install the desired role or feature. We want to install the iSCSI services on SAN.DC.Local hence, choose SAN.DC.Local from the list of servers within Server Pool.
在“選擇目標服務器”屏幕上,我們可以選擇要在其上安裝所需角色或功能的服務器或虛擬磁盤。 我們要在SAN.DC.Local上安裝iSCSI服務,因此,從Server Pool中的服務器列表中選擇SAN.DC.Local 。
On the “Select server roles” screen, we can choose the desired role from the list of roles. We want to install File and iSCSI Services. To do that, expand, File and Storage Services, expand “File and iSCSI Services” and select “iSCSI Target Server”. See the following image:
在“ 選擇服務器角色 ”屏幕上,我們可以從角色列表中選擇所需的角色。 我們要安裝文件和iSCSI服務。 為此,請展開“ 文件和存儲服務 ”,再展開“ 文件和iSCSI服務 ”,然后選擇“ iSCSI目標服務器 ”。 見下圖:
On the “Select features” screen, we can choose the required feature that we want to install. We do not want to install any feature, hence click on Next. See the following image:
在“ 選擇功能 ”屏幕上,我們可以選擇要安裝的必需功能。 我們不想安裝任何功能,因此請單擊“下一步”。 見下圖:
On Confirm installation selections screen, you can see the summary of the roles and the list of features that you are going to install on the server. Some roles and features require to restart the server during the installation process so you can enable the option to restart the server automatically during installation. Review the details of roles and click on Install. See the following image:
在“ 確認安裝選擇”屏幕上,您可以看到角色摘要以及要在服務器上安裝的功能列表。 某些角色和功能需要在安裝過程中重新啟動服務器,因此您可以啟用該選項以在安裝過程中自動重新啟動服務器。 查看角色的詳細信息,然后單擊“安裝”。 見下圖:
Once installation completes, click on Close.
安裝完成后,單擊“ 關閉” 。
To verify that the iSCSI target server role has been installed successfully, open Server Manager and expand “File and Storage Services.” See the following image:
要驗證是否已成功安裝iSCSI目標服務器角色,請打開服務器管理器,然后展開“ 文件和存儲服務” 。 見下圖:
In the left pan, you can view the iSCSI target server that has been installed. See the following image:
在左窗格中,您可以查看已安裝的iSCSI目標服務器。 見下圖:
Once the iSCSI target server has been configured, let us create an iSCSI virtual disk. To do that,
配置完iSCSI目標服務器后,讓我們創建一個iSCSI虛擬磁盤。 要做到這一點,
See the following image:
見下圖:
New iSCSI disk wizard starts. On the “Select iSCSI virtual disk location” screen, you can choose the location of the virtual disk. If you have installed the iSCSI Target Server role on multiple servers, then you can choose the desired server from the list. The list of servers with the iSCSI target role will be populated automatically in the “Servers” text box. The disk volume can be selected from the “Select by Volume” list. You can also provide the custom path in the “Type a custom path” text box. We are going to create a virtual disk on the C drive of the SAN.DC.Local, hence choose C: from the “Select by Volume” textbox. Click on Next. See the following image:
新的iSCSI磁盤向導啟動。 在“ 選擇iSCSI虛擬磁盤位置 ”屏幕上,您可以選擇虛擬磁盤的位置。 如果已在多個服務器上安裝了iSCSI Target服務器角色,則可以從列表中選擇所需的服務器。 具有iSCSI目標角色的服務器列表將自動填充在“ 服務器 ”文本框中。 可以從“ 按卷選擇 ”列表中選擇磁盤卷。 您也可以在“ 輸入自定義路徑 ”文本框中提供自定義路徑 。 我們將在SAN.DC.Local的C驅動器上創建一個虛擬磁盤,因此從“ 按卷選擇 ”文本框中選擇C :。 點擊下一步 。 見下圖:
On the “Specify iSCSI virtual disk name” screen, you can provide the desired name of the virtual disk name. Click on Next. See the following image:
在“ 指定iSCSI虛擬磁盤名稱 ”屏幕上,您可以提供所需的虛擬磁盤名稱。 點擊下一步 。 見下圖:
On the “Specify iSCSI virtual disk size” screen, you can specify the size of the virtual disk. You can create any of the following disk types:
在“ 指定iSCSI虛擬磁盤大小 ”屏幕上,您可以指定虛擬磁盤的大小。 您可以創建以下任何磁盤類型:
We want to create a disk that can be expanded based on the amount of the data added to the disk hence, choose “Dynamically expanding” disk type, enter the desired size of the disk in the “Size” textbox and click on Next. See the following image:
我們要創建一個可以根據添加到磁盤的數據量進行擴展的磁盤,因此,選擇“ 動態擴展 ”磁盤類型,在“ 大小 ”文本框中輸入所需的磁盤大小 ,然后單擊“下一步”。 見下圖:
On the “Assign iSCSI target” screen, we can provide the desired name of the iSCSI target. The iSCSI target name is used by the iSCSI initiators to identify the specific target. If you have created an iSCSI target, you can choose it from “Existing iSCSI target.” We have not created any target yet, so select “New iSCSI target” and click on “Next.” See the following image:
在“ 分配iSCSI目標 ”屏幕上,我們可以提供所需的iSCSI目標名稱。 iSCSI啟動器使用iSCSI目標名稱來標識特定目標。 如果已創建iSCSI目標,則可以從“ 現有iSCSI目標 ”中選擇它。 ”我們尚未創建任何目標,因此選擇“ New iSCSI target ”,然后單擊“ Next”。 ”,請參見下圖:
On the “Specify target name” screen, you can provide the name of the target that can be used by iSCSI initiators. Provide the desired name in “Name” textbox and click on Next. See the following image:
在“ 指定目標名稱 ”屏幕上,您可以提供iSCSI啟動器可以使用的目標的名稱。 在“ 名稱 ”文本框中提供所需的名稱,然后單擊“下一步”。 見下圖:
On the “Specify Server Access” screen, you can specify the list of iSCSI initiators that can access the virtual disk. To add the iSCSI initiators, click on Add. See the following image:
在“ 指定服務器訪問 ”屏幕上,您可以指定可以訪問虛擬磁盤的iSCSI啟動器列表。 要添加iSCSI啟動器,請單擊添加。 見下圖:
By default, the iSCSI initiator cannot connect to the target server. We must install/enable iSCSI initiators. To connect to the iSCSI target server, we can use any of the following:
默認情況下,iSCSI啟動器無法連接到目標服務器。 我們必須安裝/啟用iSCSI啟動器。 要連接到iSCSI目標服務器,我們可以使用以下任一方法:
We are going to connect the iSCSI target from DC. Local computer. To do that, on “Select a method to identify the initiator” screen, choose “DNS Name” from the type drop-down box and enter “DC.Local” in “Value” text box and click on OK to close the screen. See the following image:
我們將從DC連接iSCSI目標。 本地計算機。 為此,在“ 選擇一種方法來標識啟動器 ”屏幕上,從類型下拉框中選擇“ DNS名稱 ”,然后在“ 值 ”文本框中輸入“ DC.Local ”,然后單擊“ 確定”以關閉屏幕。 見下圖:
Back to the “Specify Server access” screen, you can see that the initiator has been added to the list. Click on Next. See the following image:
返回到“ 指定服務器訪問 ”屏幕,您可以看到啟動器已添加到列表中。 單擊下一步。 見下圖:
If you want to enable CHAP (Challenge-handshake authentication protocol) or reverse CHAP, click on “Enable CHAP” and “Enable reverse CHAP” and provide username and password. We do not want to enable CHAP or Reverse CHAP, hence click on Next. See the following image:
如果要啟用CHAP(挑戰握手身份驗證協議)或反向CHAP,請單擊“ 啟用CHAP ”和“ 啟用反向CHAP ”并提供用戶名和密碼。 我們不想啟用CHAP或反向CHAP,因此請單擊“下一步”。 見下圖:
On confirm selection screen, review all the settings, and click on “Create” to create an iSCSI virtual disk. See the following image:
在確認選擇屏幕上,查看所有設置,然后單擊“ 創建 ”以創建iSCSI虛擬磁盤。 見下圖:
On the “View Result” screen, you can see that disk has been created successfully. You can close the window. See the following image:
在“ 查看結果 ”屏幕上,您可以看到磁盤已成功創建。 您可以關閉窗口。 見下圖:
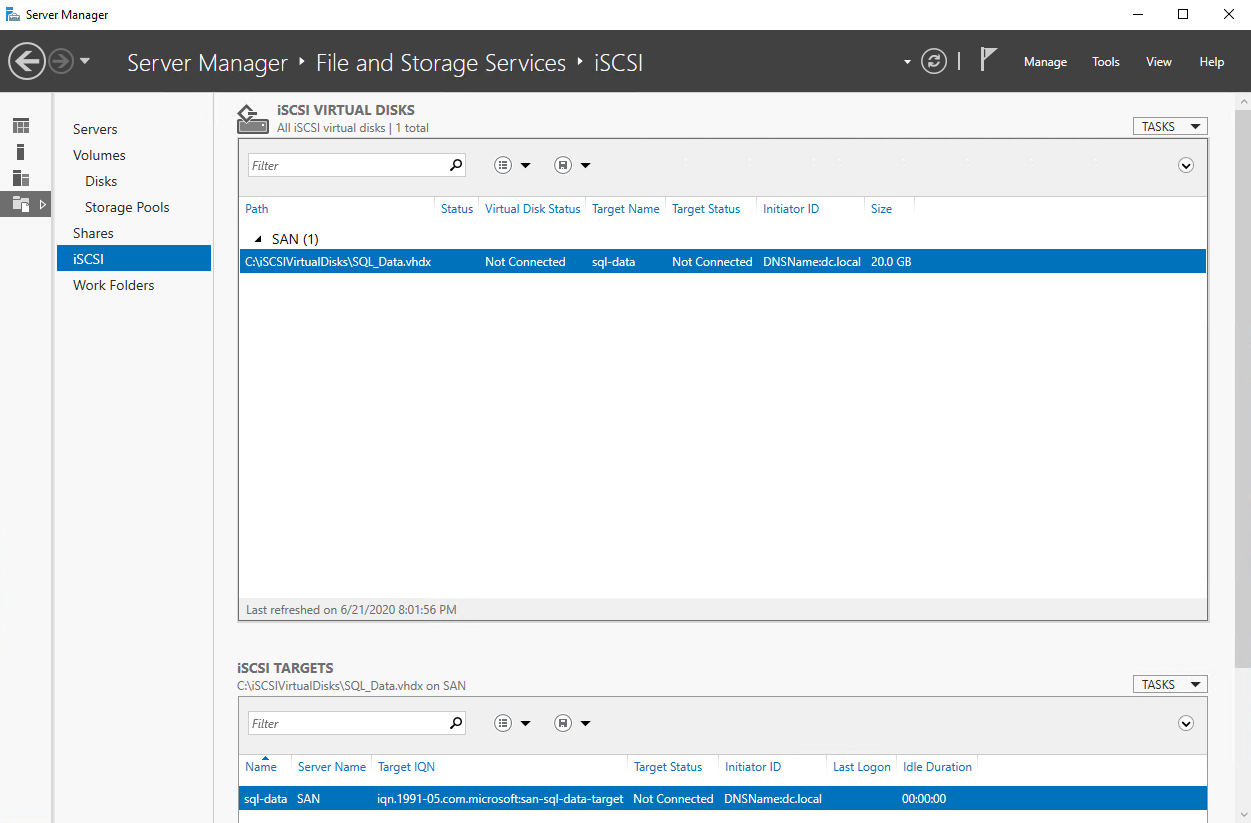
Once the disk has been created, you can see the list of iSCSI virtual disks in the server manager. See the following image.
創建磁盤后,您可以在服務器管理器中看到iSCSI虛擬磁盤的列表。 參見下圖。
In this article, I have explained how we can install the iSCSI Target Server Role and configure the iSCSI Target Server on Windows Server 2016. In my next article, I will explain that how we can configure the iSCSI initiator and use it to connect to the iSCSI virtual disk. Stay tuned!
在本文中,我已經說明了如何在Windows Server 2016上安裝iSCSI Target服務器角色并配置iSCSI Target服務器。在下一篇文章中,我將說明如何配置iSCSI啟動器并使用它來連接到iSCSI虛擬磁盤。 敬請關注!
翻譯自: https://www.sqlshack.com/installing-and-configuring-the-iscsi-target-server-on-windows-server-2016/
配置iscsi服務器
版权声明:本站所有资料均为网友推荐收集整理而来,仅供学习和研究交流使用。

工作时间:8:00-18:00
客服电话
电子邮件
admin@qq.com
扫码二维码
获取最新动态


![[Python爬虫] 之二十七:Selenium +phantomjs 利用 pyquery抓取今日头条视频](https://images2015.cnblogs.com/blog/194720/201706/194720-20170623152154132-1614505015.png)


