什么是 webpack ?
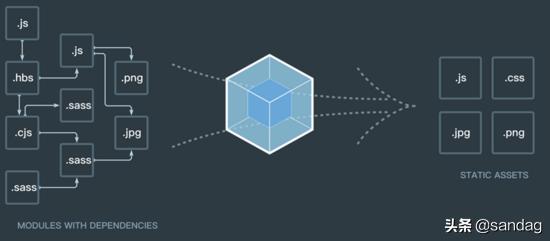
本质上,webpack 是一个现代 JavaScript 应用程序的静态模块打包器(module bundler)。当 webpack 处理应用程序时,它会递归地构建一个依赖关系图(dependency graph),其中包含应用程序需要的每个模块,然后将所有这些模块打包成一个或多个 bundle。
webpack 就像一条生产线,要经过一系列处理流程后才能将源文件转换成输出结果。 这条生产线上的每个处理流程的职责都是单一的,多个流程之间有存在依赖关系,只有完成当前处理后才能交给下一个流程去处理。 插件就像是一个插入到生产线中的一个功能,在特定的时机对生产线上的资源做处理。
webpack 通过 Tapable 来组织这条复杂的生产线。 webpack 在运行过程中会广播事件,插件只需要监听它所关心的事件,就能加入到这条生产线中,去改变生产线的运作。 webpack 的事件流机制保证了插件的有序性,使得整个系统扩展性很好。 -- 深入浅出 webpack 吴浩麟
webpack按需加载原理,入口起点(entry point)指示 webpack 应该使用哪个模块,来作为构建其内部依赖图的开始。
进入入口起点后,webpack 会找出有哪些模块和库是入口起点(直接和间接)依赖的。
每个依赖项随即被处理,最后输出到称之为 bundles 的文件中。
output 属性告诉 webpack 在哪里输出它所创建的 bundles,以及如何命名这些文件,默认值为 ./dist。
基本上,整个应用程序结构,都会被编译到你指定的输出路径的文件夹中。
webpack原理、模块,在 Webpack 里一切皆模块,一个模块对应着一个文件。Webpack 会从配置的 Entry 开始递归找出所有依赖的模块。
代码块,一个 Chunk 由多个模块组合而成,用于代码合并与分割。
loader 让 webpack 能够去处理那些非 JavaScript 文件(webpack 自身只理解 JavaScript)。
loader 可以将所有类型的文件转换为 webpack 能够处理的有效模块,然后你就可以利用 webpack 的打包能力,对它们进行处理。
本质上,webpack loader 将所有类型的文件,转换为应用程序的依赖图(和最终的 bundle)可以直接引用的模块。
webpack4?loader 被用于转换某些类型的模块,而插件则可以用于执行范围更广的任务。
插件的范围包括,从打包优化和压缩,一直到重新定义环境中的变量。插件接口功能极其强大,可以用来处理各种各样的任务。
Webpack 的运行流程是一个串行的过程,从启动到结束会依次执行以下流程 :
在以上过程中,Webpack 会在特定的时间点广播出特定的事件,插件在监听到感兴趣的事件后会执行特定的逻辑,并且插件可以调用 Webpack 提供的 API 改变 Webpack 的运行结果。
class Compiler { constructor(options) { // webpack 配置 const { entry, output } = options // 入口 this.entry = entry // 出口 this.output = output // 模块 this.modules = [] } // 构建启动 run() {} // 重写 require函数,输出bundle generate() {}}我们这里使用@babel/parser,这是 babel7 的工具,来帮助我们分析内部的语法,包括 es6,返回一个 AST 抽象语法树。
// webpack.config.jsconst path = require('path')module.exports = { entry: './src/index.js', output: { path: path.resolve(__dirname, './dist'), filename: 'main.js' }}//const fs = require('fs')const parser = require('@babel/parser')const options = require('./webpack.config')const Parser = { getAst: path => { // 读取入口文件 const content = fs.readFileSync(path, 'utf-8') // 将文件内容转为AST抽象语法树 return parser.parse(content, { sourceType: 'module' }) }}class Compiler { constructor(options) { // webpack 配置 const { entry, output } = options // 入口 this.entry = entry // 出口 this.output = output // 模块 this.modules = [] } // 构建启动 run() { const ast = Parser.getAst(this.entry) } // 重写 require函数,输出bundle generate() {}}new Compiler(options).run()webpack alias。Babel 提供了@babel/traverse(遍历)方法维护这 AST 树的整体状态,我们这里使用它来帮我们找出依赖模块。
const fs = require('fs')const path = require('path')const options = require('./webpack.config')const parser = require('@babel/parser')const traverse = require('@babel/traverse').defaultconst Parser = { getAst: path => { // 读取入口文件 const content = fs.readFileSync(path, 'utf-8') // 将文件内容转为AST抽象语法树 return parser.parse(content, { sourceType: 'module' }) }, getDependecies: (ast, filename) => { const dependecies = {} // 遍历所有的 import 模块,存入dependecies traverse(ast, { // 类型为 ImportDeclaration 的 AST 节点 (即为import 语句) ImportDeclaration({ node }) { const dirname = path.dirname(filename) // 保存依赖模块路径,之后生成依赖关系图需要用到 const filepath = './' + path.join(dirname, node.source.value) dependecies[node.source.value] = filepath } }) return dependecies }}class Compiler { constructor(options) { // webpack 配置 const { entry, output } = options // 入口 this.entry = entry // 出口 this.output = output // 模块 this.modules = [] } // 构建启动 run() { const { getAst, getDependecies } = Parser const ast = getAst(this.entry) const dependecies = getDependecies(ast, this.entry) } // 重写 require函数,输出bundle generate() {}}new Compiler(options).run()将 AST 语法树转换为浏览器可执行代码,我们这里使用@babel/core 和 @babel/preset-env。
const fs = require('fs')const path = require('path')const options = require('./webpack.config')const parser = require('@babel/parser')const traverse = require('@babel/traverse').defaultconst { transformFromAst } = require('@babel/core')const Parser = { getAst: path => { // 读取入口文件 const content = fs.readFileSync(path, 'utf-8') // 将文件内容转为AST抽象语法树 return parser.parse(content, { sourceType: 'module' }) }, getDependecies: (ast, filename) => { const dependecies = {} // 遍历所有的 import 模块,存入dependecies traverse(ast, { // 类型为 ImportDeclaration 的 AST 节点 (即为import 语句) ImportDeclaration({ node }) { const dirname = path.dirname(filename) // 保存依赖模块路径,之后生成依赖关系图需要用到 const filepath = './' + path.join(dirname, node.source.value) dependecies[node.source.value] = filepath } }) return dependecies }, getCode: ast => { // AST转换为code const { code } = transformFromAst(ast, null, { presets: ['@babel/preset-env'] }) return code }}class Compiler { constructor(options) { // webpack 配置 const { entry, output } = options // 入口 this.entry = entry // 出口 this.output = output // 模块 this.modules = [] } // 构建启动 run() { const { getAst, getDependecies, getCode } = Parser const ast = getAst(this.entry) const dependecies = getDependecies(ast, this.entry) const code = getCode(ast) } // 重写 require函数,输出bundle generate() {}}new Compiler(options).run()const fs = require('fs')const path = require('path')const options = require('./webpack.config')const parser = require('@babel/parser')const traverse = require('@babel/traverse').defaultconst { transformFromAst } = require('@babel/core')const Parser = { getAst: path => { // 读取入口文件 const content = fs.readFileSync(path, 'utf-8') // 将文件内容转为AST抽象语法树 return parser.parse(content, { sourceType: 'module' }) }, getDependecies: (ast, filename) => { const dependecies = {} // 遍历所有的 import 模块,存入dependecies traverse(ast, { // 类型为 ImportDeclaration 的 AST 节点 (即为import 语句) ImportDeclaration({ node }) { const dirname = path.dirname(filename) // 保存依赖模块路径,之后生成依赖关系图需要用到 const filepath = './' + path.join(dirname, node.source.value) dependecies[node.source.value] = filepath } }) return dependecies }, getCode: ast => { // AST转换为code const { code } = transformFromAst(ast, null, { presets: ['@babel/preset-env'] }) return code }}class Compiler { constructor(options) { // webpack 配置 const { entry, output } = options // 入口 this.entry = entry // 出口 this.output = output // 模块 this.modules = [] } // 构建启动 run() { // 解析入口文件 const info = this.build(this.entry) this.modules.push(info) this.modules.forEach(({ dependecies }) => { // 判断有依赖对象,递归解析所有依赖项 if (dependecies) { for (const dependency in dependecies) { this.modules.push(this.build(dependecies[dependency])) } } }) // 生成依赖关系图 const dependencyGraph = this.modules.reduce( (graph, item) => ({ ...graph, // 使用文件路径作为每个模块的唯一标识符,保存对应模块的依赖对象和文件内容 [item.filename]: { dependecies: item.dependecies, code: item.code } }), {} ) } build(filename) { const { getAst, getDependecies, getCode } = Parser const ast = getAst(filename) const dependecies = getDependecies(ast, filename) const code = getCode(ast) return { // 文件路径,可以作为每个模块的唯一标识符 filename, // 依赖对象,保存着依赖模块路径 dependecies, // 文件内容 code } } // 重写 require函数,输出bundle generate() {}}new Compiler(options).run()const fs = require('fs')const path = require('path')const options = require('./webpack.config')const parser = require('@babel/parser')const traverse = require('@babel/traverse').defaultconst { transformFromAst } = require('@babel/core')const Parser = { getAst: path => { // 读取入口文件 const content = fs.readFileSync(path, 'utf-8') // 将文件内容转为AST抽象语法树 return parser.parse(content, { sourceType: 'module' }) }, getDependecies: (ast, filename) => { const dependecies = {} // 遍历所有的 import 模块,存入dependecies traverse(ast, { // 类型为 ImportDeclaration 的 AST 节点 (即为import 语句) ImportDeclaration({ node }) { const dirname = path.dirname(filename) // 保存依赖模块路径,之后生成依赖关系图需要用到 const filepath = './' + path.join(dirname, node.source.value) dependecies[node.source.value] = filepath } }) return dependecies }, getCode: ast => { // AST转换为code const { code } = transformFromAst(ast, null, { presets: ['@babel/preset-env'] }) return code }}class Compiler { constructor(options) { // webpack 配置 const { entry, output } = options // 入口 this.entry = entry // 出口 this.output = output // 模块 this.modules = [] } // 构建启动 run() { // 解析入口文件 const info = this.build(this.entry) this.modules.push(info) this.modules.forEach(({ dependecies }) => { // 判断有依赖对象,递归解析所有依赖项 if (dependecies) { for (const dependency in dependecies) { this.modules.push(this.build(dependecies[dependency])) } } }) // 生成依赖关系图 const dependencyGraph = this.modules.reduce( (graph, item) => ({ ...graph, // 使用文件路径作为每个模块的唯一标识符,保存对应模块的依赖对象和文件内容 [item.filename]: { dependecies: item.dependecies, code: item.code } }), {} ) this.generate(dependencyGraph) } build(filename) { const { getAst, getDependecies, getCode } = Parser const ast = getAst(filename) const dependecies = getDependecies(ast, filename) const code = getCode(ast) return { // 文件路径,可以作为每个模块的唯一标识符 filename, // 依赖对象,保存着依赖模块路径 dependecies, // 文件内容 code } } // 重写 require函数 (浏览器不能识别commonjs语法),输出bundle generate(code) { // 输出文件路径 const filePath = path.join(this.output.path, this.output.filename) // 懵逼了吗? 没事,下一节我们捋一捋 const bundle = `(function(graph){ function require(module){ function localRequire(relativePath){ return require(graph[module].dependecies[relativePath]) } var exports = {}; (function(require,exports,code){ eval(code) })(localRequire,exports,graph[module].code); return exports; } require('${this.entry}') })(${JSON.stringify(code)})` // 把文件内容写入到文件系统 fs.writeFileSync(filePath, bundle, 'utf-8') }}new Compiler(options).run()我们通过下面的例子来进行讲解,先死亡凝视 30 秒
;(function(graph) { function require(moduleId) { function localRequire(relativePath) { return require(graph[moduleId].dependecies[relativePath]) } var exports = {} ;(function(require, exports, code) { eval(code) })(localRequire, exports, graph[moduleId].code) return exports } require('./src/index.js')})({ './src/index.js': { dependecies: { './hello.js': './src/hello.js' }, code: '"use strict";var _hello = require("./hello.js");document.write((0, _hello.say)("webpack"));' }, './src/hello.js': { dependecies: {}, code: '"use strict";Object.defineProperty(exports, "__esModule", { value: true});exports.say = say;function say(name) { return "hello ".concat(name);}' }})// 定义一个立即执行函数,传入生成的依赖关系图;(function(graph) { // 重写require函数 function require(moduleId) { console.log(moduleId) // ./src/index.js } // 从入口文件开始执行 require('./src/index.js')})({ './src/index.js': { dependecies: { './hello.js': './src/hello.js' }, code: '"use strict";var _hello = require("./hello.js");document.write((0, _hello.say)("webpack"));' }, './src/hello.js': { dependecies: {}, code: '"use strict";Object.defineProperty(exports, "__esModule", { value: true});exports.say = say;function say(name) { return "hello ".concat(name);}' }})// 定义一个立即执行函数,传入生成的依赖关系图;(function(graph) { // 重写require函数 function require(moduleId) { ;(function(code) { console.log(code) // "use strict";var _hello = require("./hello.js");document.write((0, _hello.say)("webpack")); eval(code) // Uncaught TypeError: Cannot read property 'code' of undefined })(graph[moduleId].code) } // 从入口文件开始执行 require('./src/index.js')})({ './src/index.js': { dependecies: { './hello.js': './src/hello.js' }, code: '"use strict";var _hello = require("./hello.js");document.write((0, _hello.say)("webpack"));' }, './src/hello.js': { dependecies: {}, code: '"use strict";Object.defineProperty(exports, "__esModule", { value: true});exports.say = say;function say(name) { return "hello ".concat(name);}' }})可以看到,我们在执行"./src/index.js"文件代码的时候报错了,这是因为 index.js 里引用依赖 hello.js,而我们没有对依赖进行处理,接下来我们对依赖引用进行处理。
// 定义一个立即执行函数,传入生成的依赖关系图;(function(graph) { // 重写require函数 function require(moduleId) { // 找到对应moduleId的依赖对象,调用require函数,eval执行,拿到exports对象 function localRequire(relativePath) { return require(graph[moduleId].dependecies[relativePath]) // {__esModule: true, say: ƒ say(name)} } // 定义exports对象 var exports = {} ;(function(require, exports, code) { // commonjs语法使用module.exports暴露实现,我们传入的exports对象会捕获依赖对象(hello.js)暴露的实现(exports.say = say)并写入 eval(code) })(localRequire, exports, graph[moduleId].code) // 暴露exports对象,即暴露依赖对象对应的实现 return exports } // 从入口文件开始执行 require('./src/index.js')})({ './src/index.js': { dependecies: { './hello.js': './src/hello.js' }, code: '"use strict";var _hello = require("./hello.js");document.write((0, _hello.say)("webpack"));' }, './src/hello.js': { dependecies: {}, code: '"use strict";Object.defineProperty(exports, "__esModule", { value: true});exports.say = say;function say(name) { return "hello ".concat(name);}' }})这下应该明白了吧 ~ 可以直接复制上面代码到控制台输出哦~
webpack是什么。Webpack 是一个庞大的 Node.js 应用,如果你阅读过它的源码,你会发现实现一个完整的 Webpack 需要编写非常多的代码。 但你无需了解所有的细节,只需了解其整体架构和部分细节即可。
对 Webpack 的使用者来说,它是一个简单强大的工具; 对 Webpack 的开发者来说,它是一个扩展性的高系统。
Webpack 之所以能成功,在于它把复杂的实现隐藏了起来,给用户暴露出的只是一个简单的工具,让用户能快速达成目的。 同时整体架构设计合理,扩展性高,开发扩展难度不高,通过社区补足了大量缺失的功能,让 Webpack 几乎能胜任任何场景。
版权声明:本站所有资料均为网友推荐收集整理而来,仅供学习和研究交流使用。

工作时间:8:00-18:00
客服电话
电子邮件
admin@qq.com
扫码二维码
获取最新动态