ssma5.3
This is a second article that is a continuation of the Microsoft SQL Server Migration Assistant (SSMA) v7.1 for Oracle. In my first article I wrote an overview about the tool and how to install it. In this second article I will write about how to use it to migrate data and objects from an Oracle database to a SQL Server database.
這是第二篇文章,是Oracle的Microsoft SQL Server遷移助手(SSMA)v7.1的繼續 。 在我的第一篇文章中,我寫了關于該工具及其安裝方法的概述。 在第二篇文章中,我將介紹如何使用它將數據和對象從Oracle數據庫遷移到SQL Server數據庫。
As described in my first article, SSMA v7.1 for Oracle consists of a GUI client application, which must be installed on the computer from which you will perform the migration steps and there is also an extension pack to be installed on the target SQL Server machine. To start working with this tool, connect to the machine that has the GUI client application installed and click in the icon on the desktop. If for some reason you don’t have it in your desktop you can find the application file in the location you installed it (default path is C:\Program Files (x86)\Microsoft SQL Server Migration Assistant for Oracle\bin) where should be the 64bit (SSMAforOracle.exe) and 32bit (SSMAforOracle32.exe ) versions.
如我的第一篇文章所述,Oracle的SSMA v7.1由一個GUI客戶端應用程序組成,該應用程序必須安裝在要從中執行遷移步驟的計算機上,并且在目標SQL Server上還要安裝一個擴展包。機。 要開始使用此工具,請連接到安裝了GUI客戶端應用程序的計算機,然后單擊桌面上的圖標。 如果由于某種原因您的桌面上沒有該文件,則可以在安裝文件的位置找到該應用程序文件(默認路徑為C:\ Program Files(x86)\ Microsoft SQL Server Migration Assistant for Oracle \ bin )。是64位(SSMAforOracle.exe)和32位(SSMAforOracle32.exe)版本。
NOTE: The SQL Server Agent service must be running in the target SQL Server instance to create and run migration jobs.
注意:SQL Server代理服務必須在目標SQL Server實例中運行才能創建和運行遷移作業。
There is no need for a user with high privileges as SYSDBA to execute the migrations. As usual and for security reasons, always uses the minimum required privileges and for SSMA v7.1 for Oracle the account to connect to the Oracle database must have CONNECT permissions to obtain metadata from schemas owned by the user. In the case the user needs to migrate from objects in other schemas the account must have the following permissions:
不需要具有SYSDBA特權的用戶來執行遷移。 與往常一樣,出于安全原因,請始終使用最低要求的特權,對于Oracle的SSMA v7.1,連接到Oracle數據庫的帳戶必須具有CONNECT權限才能從用戶擁有的架構中獲取元數據。 如果用戶需要從其他架構中的對象遷移,則該帳戶必須具有以下權限:
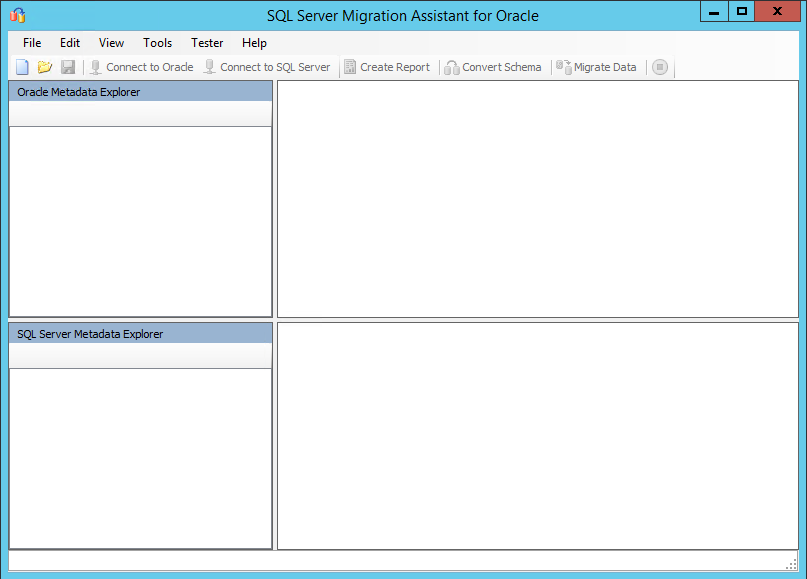
When opening the GUI for the first time the default layout will be presented:
首次打開GUI時,將顯示默認布局:
At the top it has the usual menu options and toolbar icons, followed by the two Metadata Explorer parts. In the first part it will be presented the metadata information from the source (an Oracle database) and in the second part it will be presented the metadata information from the target (a SQL Server instance). This Layout can be altered by using the menu View / Layouts:
它的頂部具有常用的菜單選項和工具欄圖標,其后是兩個Metadata Explorer部分。 在第一部分中,將顯示來自源(Oracle數據庫)的元數據信息,在第二部分中,將顯示來自目標(SQL Server實例)的元數據信息。 可以使用菜單查看/布局來更改此布局 :
A new project needs to be created to start a migration process. A new project can be created using the menu File/New Project… option or simple by clicking in the New Project… icon in the toolbar.
需要創建一個新項目以開始遷移過程。 可以使用菜單文件/新建項目…來創建一個新項目,也可以通過單擊工具欄中的新建項目…來簡單地創建一個新項目。
Provide a Name to the project, a path for the Location of the project files (source database metadata information, configurations and mappings are saved in those files) and chose the target database version from the supported versions in the Migrate To combo box:
提供項目的名稱 ,項目文件位置的路徑(源數據庫元數據信息,配置和映射已保存在這些文件中),并在“ 遷移到”組合框中從受支持的版本中選擇目標數據庫版本:
After the creation of the project you are able to review and change the settings for the current project in the menu Tools / Project Settings (for specifying settings for all SSMA projects, select Default Project Settings instead):
創建項目后,您可以查看和更改設置菜單中的工具當前項目/項目設置 (對所有項目SSMA指定設置,選擇默認項目設置代替 ):
Clicking in the (Default) Project Settings you will see on the top left side you can choose between 3 predefined Modes (Default, Full and Optimistic) and a Custom mode where you can configure it as you will. For the sake of this article size and to keep things simple, in this article I will proceed with the Default mode but you can play around to see how some options change with the different modes (they will be in bold so you can see better those changes):
單擊(默認)項目設置,您將在左上角看到,您可以在3種預定義模式 (默認,完全和樂觀)和自定義模式之間進行選擇,在該模式下可以對其進行配置。 為了本文的大小和簡化起見,在本文中,我將繼續使用“默認”模式,但您可以試一下一些選項在不同模式下的變化(它們將以粗體顯示,因此您可以更好地看到那些變化):
On the top right side there is a combo box where you will need to provide the Migration Target Version of the SQL Server. I am using a SQL Server 2014 to write this article so is the one that I will use:
在右上角有一個組合框,您需要在其中提供SQL Server的遷移目標版本 。 我正在使用SQL Server 2014撰寫本文,因此將使用:
There are few settings that worth to be explained in the Migration pane since they are important to understand the rest of this article:
在“ 遷移”窗格中,幾乎沒有什么值得解釋的設置,因為它們對于理解本文的其余部分很重要:
Migration Engine | Client Side Data Migration Engine mode will use the SSMA client to retrieve data from the Oracle database and Bulk Insert method to insert the data in the SQL Server database. Server Side Data Migration Engine mode will use a SQL Agent job to run a BCP command to retrieve data from the Oracle database and insert the data in the SQL Server database. When choosing this method you will need to specify which version of the BCP is pretended to use (32bit or 64bit): |
Batch size | Data are migrating in batches from Oracle tables into SQL Server tables inside transactions. The batch size option sets the number of rows loaded into SQL Server in each transaction. The default number is 10000. |
Parallel Data Migration Mode | This option is only available on choosing Client Side Data Migration Engine mode and it sets the number of parallel threads to be used in parallel. By default is set to Auto (10 threads). To change this value set this option to Custom and provide the new number of threads to be run in parallel:
|
遷移引擎 | 客戶端數據遷移引擎模式將使用SSMA客戶端從Oracle數據庫檢索數據,并使用批量插入方法將數據插入SQL Server數據庫。 服務器端數據遷移引擎模式將使用SQL代理作業運行BCP命令以從Oracle數據庫檢索數據并將數據插入SQL Server數據庫。 選擇此方法時,您需要指定要假裝使用哪個BCP版本(32位或64位): |
批量大小 | 數據正在從Oracle表批量遷移到事務內部SQL Server表中。 批處理大小選項設置每個事務中加載到SQL Server的行數。 默認值為10000。 |
并行數據遷移模式 | 此選項僅在選擇客戶端數據遷移引擎模式時可用,并且它設置要并行使用的并行線程數。 默認情況下設置為自動(10個線程)。 要更改此值,請將此選項設置為Custom并提供要并行運行的新線程數: |
After creating a project the Connect to Oracle and Connect to SQL Server will be available.
創建項目后, 將可以使用Connect to Oracle和Connect to SQL Server 。
From the menu:
從菜單中:
And from the toolbar:
從工具欄:
In case of errors during the connections, check the Output pane for respective error messages that can lead you to solve the issue. You can also check the log (default location is C:\Users\UserID\AppData\Roaming\Microsoft SQL Server Migration Assistant\Oracle\log\) for more detailed information about the error.
如果在連接過程中出現錯誤,請檢查“輸出”窗格中是否有相應的錯誤消息,這些消息可以引導您解決問題。 您也可以檢查日志(默認位置為C:\ Users \ UserID \ AppData \ Roaming \ Microsoft SQL Server遷移助手\ Oracle \ log \ ),以獲取有關該錯誤的更多詳細信息。
To connect to the desired Oracle database you will need to provide the necessary information for SSMA can establish the connection to the source database.
要連接到所需的Oracle數據庫,您將需要提供必要的信息,以便SSMA可以建立與源數據庫的連接。
The first step is to click on the Connect to Oracle option to provide the necessary information for the connection to the source database.
第一步是單擊“ 連接到Oracle”選項,以提供必要的信息以連接到源數據庫。
Choose the Provider depending on the client that you have installed:
根據您安裝的客戶端選擇提供程序:
And there are three modes available:
共有三種模式:
In the Standard mode provide the Serve name, port (by default is presented the port 1521), an Oracle SID and the user credentials (name and password):
在標準模式下,提供服務名稱,端口(默認情況下為端口1521),Oracle SID和用戶憑證(名稱和密碼):
In the TNSNAME mode provide the connection identifier previously added in the TNSNAMES.ora file and the user credentials (name and password):
在TNSNAME模式下,提供先前在TNSNAMES.ora文件中添加的連接標識符和用戶憑證(名稱和密碼):
The Connection String mode is not recommended because it leaves the password visible. You can see a warning stating that in this option:
不建議使用“連接字符串”模式,因為它會使密碼可見。 您可以在此選項中看到警告說明:
The connection to the source database server stays active until the project is closed. When reopening the project a reconnect to the source database is also needed. All the connection information is stored and you will only need to provide the password when reconnecting. The exception is for the Connection String mode where the password is stored together with the Connection String.
與源數據庫服務器的連接將保持活動狀態,直到關閉項目為止。 重新打開項目時,還需要重新連接到源數據庫。 所有的連接信息都已存儲,您只需在重新連接時提供密碼。 連接字符串模式例外,其中密碼與連接字符串一起存儲。
Working offline is also possible but a connection to the source database will be requested when you need to refresh the metadata (can only be done manually since is not automatically refreshed) or load the database objects into SQL Server and migrate the data.
也可以脫機工作,但是當您需要刷新元數據(只能手動完成,因為不會自動刷新)或將數據庫對象加載到SQL Server并遷移數據時,將請求連接到源數據庫。
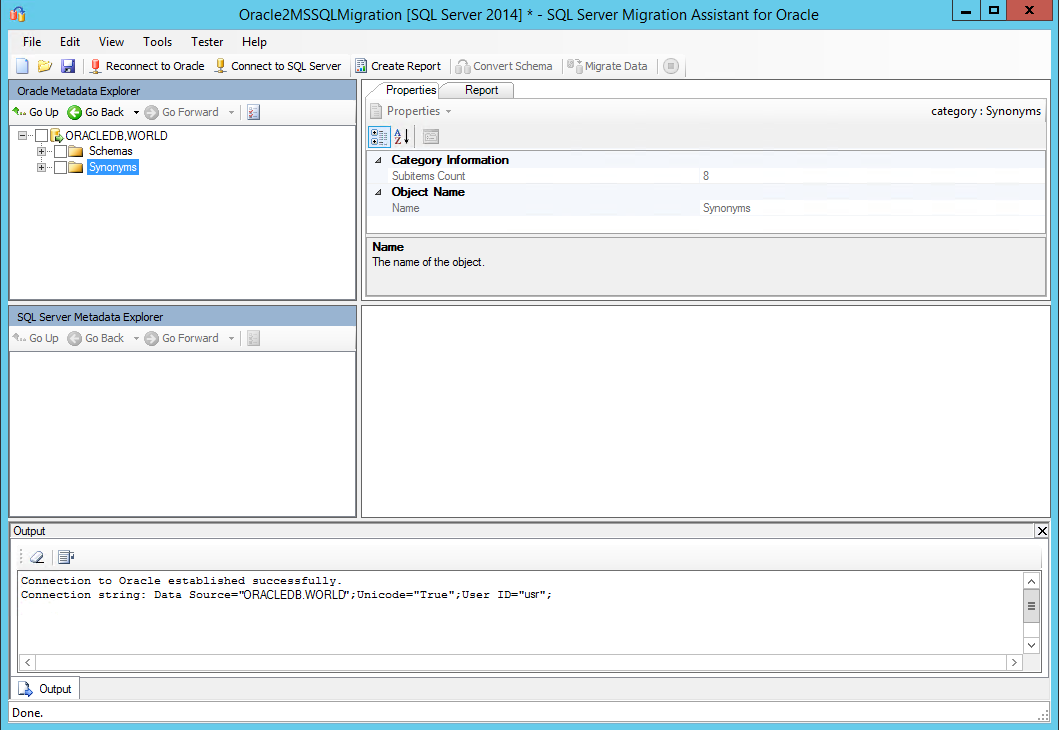
After a successful connection, Oracle schemas it will appear in Oracle Metadata Explorer.
成功連接后,它將在Oracle Metadata Explorer中顯示它的Oracle模式。
In the top left pane, called Oracle Metadata Explorer, you will see the Oracle database and the available schemas and synonyms if any exists. Drilling down to an object level you will see in the top right pane the respective object properties. It varies depending on the object type.
在稱為Oracle Metadata Explorer的左上方窗格中,您將看到Oracle數據庫以及可用的模式和同義詞(如果存在)。 向下鉆取到對象級別,您將在右上窗格中看到相應的對象屬性。 它隨對象類型的不同而不同。
Right-clicking on objects in Oracle Metadata Explorer, a context menu will appear with the available tasks that can be performed for the respective object. Those tasks can also be performed by using the toolbars and menus.
右鍵單擊Oracle Metadata Explorer中的對象,將顯示一個上下文菜單,其中包含可以對相應對象執行的可用任務。 這些任務也可以通過使用工具欄和菜單來執行。
After connecting to the source Oracle database you should now connect to the target SQL Server instance by clicking on the Connect to SQL Server option and provide the necessary information for the connection to the target database.
連接到源Oracle數據庫之后,現在應該通過單擊“ 連接到SQL Server”選項連接到目標SQL Server實例,并提供連接到目標數據庫的必要信息。
Provide the Server name for the SQL Server instance and the Server port if it is not using the default port 1433. Indicate the Database that will receive the migrated objects and data and configure the Authentication mode. If you are using SQL Server Authentication mode you’ll need to provide the SQL Server user and password that will be used for the connection. Be sure that the user that is provided has sysadmin server role in the target SQL Server instance:
提供SQL Server實例的服務器名稱和服務器端口(如果未使用默認端口1433)。指示將接收遷移的對象和數據的數據庫 ,并配置身份驗證模式。 如果使用SQL Server身份驗證模式,則需要提供將用于連接SQL Server用戶和密碼。 確保提供的用戶在目標SQL Server實例中具有sysadmin服務器角色:
If you are not running the SSMA tool locally then for security reasons keep the Encrypt Connection and Trust Server Certificate options checked.
如果您不是在本地運行SSMA工具,則出于安全原因,請選中“ 加密連接和信任服務器證書”選項。
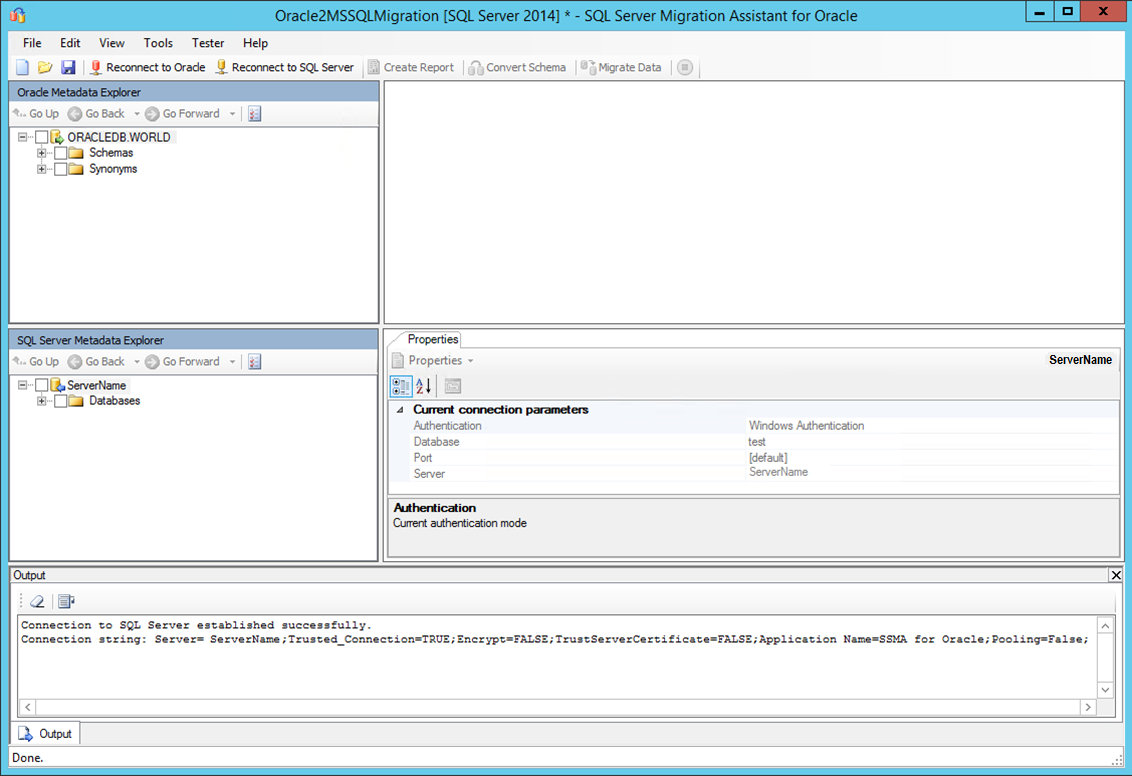
After a successful connection your SSMA screen should look similar to the next one:
成功連接后,您的SSMA屏幕應類似于下一個屏幕:
In the Oracle Metadata Explorer drill drown until the Schemas level and chose in the Schema that you want to migrate the objects to be migrated. When migrating all objects, click at the Schema level so all the objects belonging that Schema will be automatically selected. It will also present the number of selected objects from the total number of objects that exists in each object type:
在Oracle Metadata Explorer中鉆進淹沒,直到架構級別,然后在架構中選擇要遷移的對象。 遷移所有對象時,請在架構級別單擊,以便將自動選擇屬于該架構的所有對象。 還將從每種對象類型中存在的對象總數中顯示所選對象的數量:
After connecting to Oracle and SQL Server databases, move the focus to the Oracle Schema that you want to migrate to have the following options enabled in the Toolbar (same options can be found enabled in the menu Tools):
連接到Oracle和SQL Server數據庫后,將焦點移到要遷移的Oracle模式上,以在工具欄中啟用以下選項(可以在“工具”菜單中找到相同的選項):
By default a target schema with the same name as the source schema will be created in the target SQL Server database. This can be changed by providing the new schema name. To do that select the source schema name in the Oracle Metadata Explorer so the scope in the respective Details pane will be the schema:
默認情況下,將在目標SQL Server數據庫中創建與源模式同名的目標模式。 可以通過提供新的架構名稱來更改。 為此,請在Oracle Metadata Explorer中選擇源模式名稱,這樣相應的Details窗格中的作用域將成為模式:

Click on Modify button to provide the new target schema name (you can also use this option to modify the target database):
單擊修改按鈕以提供新的目標模式名稱(您也可以使用此選項來修改目標數據庫):
NOTE: In this article we are going to continue with the default names.
注意:在本文中,我們將繼續使用默認名稱。
Use this option before starting with the migration process. This will return a report of errors and warnings identifying potential migration issues, so you can mitigate them first before proceeding with the migration.
在開始遷移過程之前,請使用此選項。 這將返回錯誤和警告報告,指出潛在的遷移問題,因此您可以在進行遷移之前先緩解它們。
In case of errors it usually means that a particular object can’t be migrated as is and the object should be rewritten to be convertible for SQL Server. Other option is to remove the object(s) from the migration list if it’s acceptable that it won’t be needed or it will be replaced in the SQL Server migrated database with some other native solution.
如果發生錯誤,通常意味著不能按原樣遷移特定對象,并且應將對象重寫為可轉換為SQL Server。 另一個選擇是,如果可以不需要該對象,或者將其用其他本機解決方案替換在SQL Server遷移的數據庫中,則從遷移列表中刪除該對象。
In case of warnings it usually means that the object can be migrated but will lose some particular feature that doesn’t exist in SQL Server. You can accept that outcome or alternatively rewrite the object creation code to be 100% convertible for SQL Server.
在出現警告的情況下,通常意味著可以遷移對象,但是將丟失SQL Server中不存在的某些特定功能。 您可以接受該結果,也可以重寫對象創建代碼以使其可以100%轉換為SQL Server。
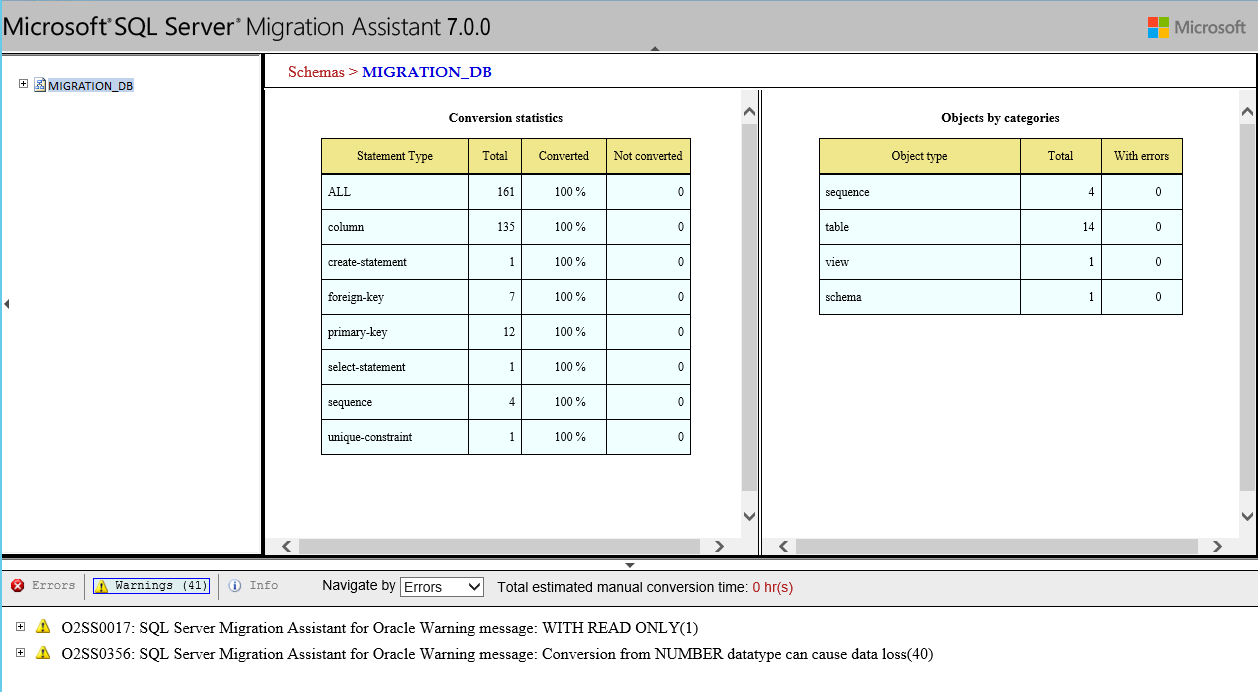
In my case I had no errors and the warnings presented in the next figure:
在我的情況下,我沒有錯誤,警告如下圖所示:
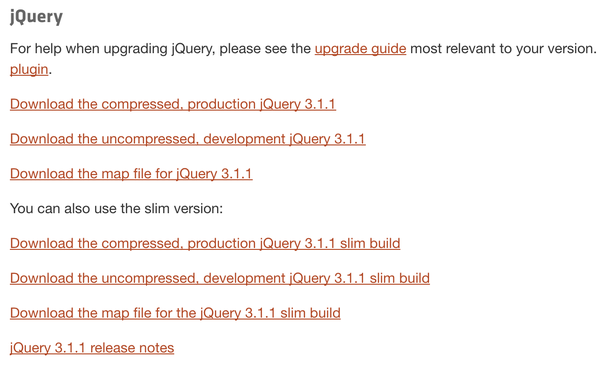
The report is generated in an HTML format and can be read by any browser. Besides presenting the errors, warnings and other informational data it also allows you to navigate through each error and warning presenting valuable information to mitigate each one. And it also presents an estimated manual conversion time for each issue’s mitigation as well the estimated total manual of time needed to mitigate all issues.
該報告以HTML格式生成,并且可以由任何瀏覽器讀取。 除了顯示錯誤,警告和其他信息數據之外,它還使您可以瀏覽每個錯誤并提供有價值的信息以減輕每個錯誤。 并且它還提供了緩解每個問題的估計手動轉換時間,以及緩解所有問題所需的估計總時間。
After getting the assessment report from the previous step you can now start to convert objects from Oracle Schema to the respective SQL Server objects. This option will not create or load the information into the SQL Server instance but load only the information into the SSMA metadata so you can view the objects and their properties in the SQL Server Metadata Explorer pane.
從上一步獲得評估報告后,您現在可以開始將對象從Oracle架構轉換為相應SQL Server對象。 此選項不會創建信息或將信息加載到SQL Server實例中,而只會將信息加載到SSMA元數據中,因此您可以在“ SQL Server元數據資源管理器”窗格中查看對象及其屬性。
Similar to the Create Report option, Schema conversion prints output messages to the Output pane and error messages to the Error List pane. Use the output and error information to determine whether you have to modify your Oracle databases or your conversion process to obtain the desired conversion results.
與“創建報告”選項類似,架構轉換將輸出消息打印到“輸出”窗格,將錯誤消息打印到“錯誤列表”窗格。 使用輸出和錯誤信息來確定是否必須修改Oracle數據庫或轉換過程才能獲得所需的轉換結果。
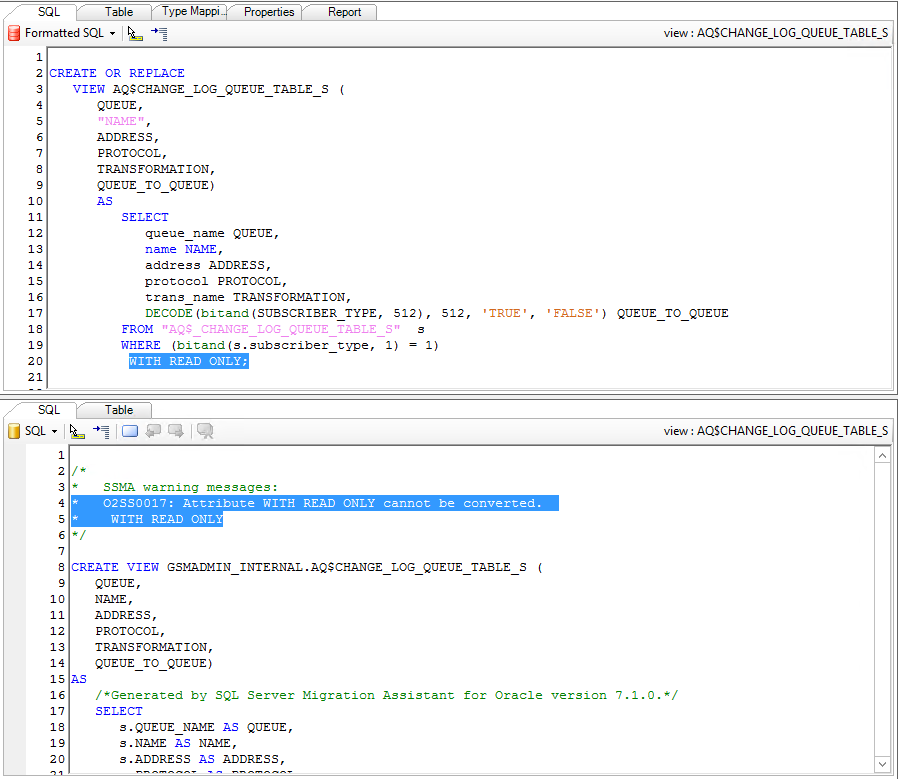
In my case there is an Oracle View created WITH READ ONLY option and I just need to remove the respective line by editing the View definition.
在我的情況下,有一個使用WITH READ ONLY選項創建的Oracle View,我只需要通過編輯View定義來刪除相應的行。
NOTE: Altering the code in SSMA does not really alter the code in the Oracle database. These changes only affect the local metadata that will be used for the migration.
注意:更改SSMA中的代碼并不會真正更改Oracle數據庫中的代碼。 這些更改僅影響將用于遷移的本地元數據。
Selecting an object in the Oracle object details pane will present in the converted object code in the SQL Server object details pane where you can find comments about the errors and warnings so you can make the necessary changes to allow the migration running without errors.
在Oracle對象詳細信息窗格中選擇一個對象將顯示在SQL Server對象詳細信息窗格中轉換后的對象代碼中,您可以在其中找到有關錯誤和警告的注釋,以便可以進行必要的更改以使遷移無錯誤地運行。
I still have 40 conversion warnings about a conversion issue. I could just accept any possible data loss but I will opt for changing the target data type by editing the Type Mapping in the Project properties for the Columns Type Mapping so this change will affect all objects in the current migration project:
關于轉換問題,我仍然有40條轉換警告。 我可以接受任何可能的數據丟失,但是我將選擇通過在Columns Type Mapping的Project屬性中編輯Type Mapping來更改目標數據類型,以便此更改將影響當前遷移項目中的所有對象:
By default a number data type in Oracle is mapped to a float[53] in SQL Server. Changing this to numeric and run the convert schema again by overwriting the existing object definitions it should clear my warning list.
默認情況下,Oracle中的數字數據類型映射到SQL Server中的float [53] 。 將其更改為數字,然后通過覆蓋現有對象定義再次運行轉換模式,它將清除我的警告列表。
This was a quick mitigation example but do not expect this to be easy for every migration. Database with more objects may lead to more complex mitigations.
這是一個快速的緩解示例,但是不要期望每個遷移都如此簡單。 具有更多對象的數據庫可能會導致更復雜的緩解措施。
Now that you have all objects of the Oracle schema converted into SSMA metadata and the issues mitigated, you are able to start the migration of the data into the SQL Server database. You can confirm in the SQL Server Metadata Explorer that a Schema has been created to receive the data from Oracle:
現在,您已經將Oracle架構的所有對象都轉換為SSMA元數據,并且已解決了問題,現在可以開始將數據遷移到SQL Server數據庫中了。 您可以在SQL Server元數據資源管理器中確認已創建架構以從Oracle接收數據:
There is also a new schema called ssma_oracle that is used to support the migration and should be deleted by SSMA as soon the migration ends.
還有一個名為ssma_oracle的新模式,用于支持遷移,并且遷移結束后應由SSMA刪除。
By clicking in the Migrate Data option you will be asked to connect again to the Oracle and SQL Server databases. A pop-up window will report about the success of the migration and you can then confirm it by logging in the SQL Server database using the SQL Server Management Studio (SSMS):
通過單擊“ 遷移數據”選項,將要求您再次連接到Oracle和SQL Server數據庫。 彈出窗口將報告有關遷移成功的信息,然后您可以通過使用SQL Server Management Studio(SSMS)登錄SQL Server數據庫來進行確認:
Confirm that all objects and data are corrected migrated and you should have finished with success your Oracle to SQL Server migration.
確認已正確糾正所有對象和數據的遷移,并且您應該成功完成從Oracle到SQL Server的遷移。
翻譯自: https://www.sqlshack.com/using-ssma-v7-1-for-oracle-to-migrate-into-sql-server/
ssma5.3
版权声明:本站所有资料均为网友推荐收集整理而来,仅供学习和研究交流使用。

工作时间:8:00-18:00
客服电话
电子邮件
admin@qq.com
扫码二维码
获取最新动态


