本文的ELK全家桶版本為7.2.0,Kafka版本為2.12-2.3.0。
主要的操作有:關閉selinux安全機制,關閉firewalld防火墻,關閉swap交換內存空間,文件及內存限制配置,設置jvm參數,創建普通用戶,準備磁盤存儲目錄等;建議做好服務器間的免密登陸操作。
filebeat斷網、auto_elk_env.sh
#!/bin/bash
echo "##### Update /etc/hosts #####"
cat >> /etc/hosts <<EOF
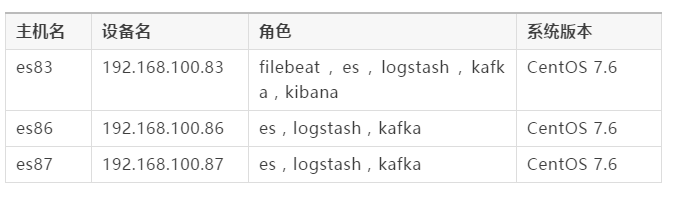
192.168.100.83 es83
192.168.100.86 es86
192.168.100.87 es87
EOFecho "##### Stop firewalld #####"
systemctl stop firewalld
systemctl disable firewalldecho "##### Close selinux #####"
setenforce 0
sed -i "s/SELINUX=enforcing/SELINUX=disabled/g" /etc/selinux/configecho "##### Close swap #####"
swapoff -a# 提示:修改完該文件后,需重新登錄終端才可生效,可通過ulimit -a查看。
echo "##### Modify /etc/security/limits.conf #####"
cat > /etc/security/limits.conf <<EOF
* soft nofile 65536
* hard nofile 131072
* soft nproc 65536
* hard nproc 65536
* soft memlock unlimited
* hard memlock unlimited
EOFecho "##### Modify /etc/sysctl.conf #####"
cat >> /etc/sysctl.conf <<EOF
vm.max_map_count=562144
EOF
sysctl -pecho "##### Create user(密碼隨意) #####"
useradd elkuser
echo 123456 | passwd --stdin elkuserecho "##### 配置SSH免密通信 #####"
ssh-keygen # 一路回車即可
ssh-copy-id 192.168.100.83
ssh-copy-id 192.168.100.86
ssh-copy-id 192.168.100.87
Elasticsearch 是一個分布式、RESTful風格的搜索和數據分析引擎;它實現了用于全文檢索的倒排索引,而且為每個數據都編入了索引,搜索速度非常快;它具有可擴展性和彈性,每秒鐘能處理海量事件,并且它適用于所有數據類型,例如結構化數據、非結構化數據、地理位置等。
筆者在生產環境上,為Elasticsearch分配了30G內存(最大不要超過32G),6塊446G的SSD磁盤,并使用G1的垃圾回收策略,關于硬件配置大家根據實際情況來分配使用!
filebeat啟動命令?提示:筆者已事先下載好了所有軟件包到服務器上;本文的三個es節點默認都做主節點和數據節點,當使用xpack加密時,主節點也必須做數據節點,否則加密配置寫入不進es存儲!
在本文中,筆者直接在83節點上完成了es集群的部署,請仔細閱讀下方的命令!
# 下載方式:wget https://artifacts.elastic.co/downloads/elasticsearch/elasticsearch-7.2.0-linux-x86_64.tar.gz
echo "##### 解壓Elasticsearch #####"
[root@es83 ~]# cd /home/elkuser/
[root@es83 elkuser]# tar -xvf elasticsearch-7.2.0-linux-x86_64.tar.gzecho "##### 修改jvm文件 #####"
[root@es83 elkuser]# cd ./elasticsearch-7.2.0/
[root@es83 elasticsearch-7.2.0]# sed -i -e 's/1g/30g/g' -e '36,38s/^-/#&/g' ./config/jvm.options
[root@es83 elasticsearch-7.2.0]# sed -i -e 'N;38 a -XX:+UseG1GC \n-XX:MaxGCPauseMillis=50' ./config/jvm.optionsecho "##### 生成關鍵證書文件 #####"
[root@es83 elasticsearch-7.2.0]# ./bin/elasticsearch-certutil ca
......
Please enter the desired output file [elastic-stack-ca.p12]: 回車Enter
Enter password for elastic-stack-ca.p12 : 回車Enterecho "##### 利用關鍵證書生成所有es節點證書文件 #####"
[root@es83 elasticsearch-7.2.0]# ./bin/elasticsearch-certutil cert --ca elastic-stack-ca.p12 --ip 192.168.100.83
......
Enter password for CA (elastic-stack-ca.p12) : 回車Enter
Please enter the desired output file [elastic-certificates.p12]: es83.p12
Enter password for es83.p12 : 回車Enter[root@es83 elasticsearch-7.2.0]# ./bin/elasticsearch-certutil cert --ca elastic-stack-ca.p12 --ip 192.168.100.86
......
Enter password for CA (elastic-stack-ca.p12) : 回車Enter
Please enter the desired output file [elastic-certificates.p12]: es86.p12
Enter password for es86.p12 : 回車Enter[root@es83 elasticsearch-7.2.0]# ./bin/elasticsearch-certutil cert --ca elastic-stack-ca.p12 --ip 192.168.100.87
......
Enter password for CA (elastic-stack-ca.p12) : 回車Enter
Please enter the desired output file [elastic-certificates.p12]: es87.p12
Enter password for es87.p12 : 回車Enterecho "##### 利用關鍵證書生成后續logstash所需證書 #####"
[root@es83 elasticsearch-7.2.0]# openssl pkcs12 -in elastic-stack-ca.p12 -clcerts -nokeys > root.cer
[root@es83 elasticsearch-7.2.0]# openssl x509 -in root.cer -out root.pemecho "##### 利用關鍵證書生成后續kibana所需證書 #####"
[root@es83 elasticsearch-7.2.0]# ./bin/elasticsearch-certutil cert --ca elastic-stack-ca.p12 -name "CN=something,OU=Consulting Team,DC=mydomain,DC=com"
......
Enter password for CA (elastic-stack-ca.p12) : 回車Enter
Please enter the desired output file [CN=something,OU=Consulting Team,DC=mydomain,DC=com.p12]: client.p12
Enter password for client.p12 : 回車Enterecho "##### 移動所生成的證書文件到指定目錄下 #####"
[root@es83 elasticsearch-7.2.0]# cp *.p12 ./config/echo "##### 修改es配置文件 #####"
[root@es83 elasticsearch-7.2.0]# cat > ./config/elasticsearch.yml <<EOF
cluster.name: chilu_elk
node.name: es83
node.master: true
node.data: true
path.data: /logdata/data1,/logdata/data2,/logdata/data3,/logdata/data4,/logdata/data5,/logdata/data6
bootstrap.memory_lock: true
bootstrap.system_call_filter: false
network.host: 192.168.100.83
http.port: 9200
transport.tcp.port: 9300
discovery.zen.ping.unicast.hosts: ["192.168.100.83:9300","192.168.100.86:9300","192.168.100.87:9300"]
cluster.initial_master_nodes: ["192.168.100.83:9300","192.168.100.86:9300","192.168.100.87:9300"]
node.max_local_storage_nodes: 256
indices.fielddata.cache.size: 50%
http.cors.enabled: true
http.cors.allow-origin: "*"xpack.security.enabled: true
xpack.security.transport.ssl.enabled: true
xpack.security.transport.ssl.verification_mode: certificate
xpack.security.transport.ssl.keystore.path: es83.p12
xpack.security.transport.ssl.truststore.path: elastic-stack-ca.p12xpack.security.http.ssl.enabled: true
xpack.security.http.ssl.keystore.path: es83.p12
xpack.security.http.ssl.truststore.path: elastic-stack-ca.p12
xpack.security.http.ssl.client_authentication: optional
EOFecho "##### scp目錄到其他節點上,并修改配置 #####"
[root@es83 elasticsearch-7.2.0]# cd ../
[root@es83 elkuser]# scp -r ./elasticsearch-7.2.0 192.168.100.86:/home/elkuser/
[root@es83 elkuser]# scp -r ./elasticsearch-7.2.0 192.168.100.87:/home/elkuser/
[root@es83 elkuser]# ssh 192.168.100.86 "sed -i -e 's/es83/es86/g' -e '8s/192.168.100.83/192.168.100.86/' /home/elkuser/elasticsearch-7.2.0/config/elasticsearch.yml"
[root@es83 elkuser]# ssh 192.168.100.87 "sed -i -e 's/es83/es87/g' -e '8s/192.168.100.83/192.168.100.87/' /home/elkuser/elasticsearch-7.2.0/config/elasticsearch.yml"echo "##### 修改各目錄的屬主和組 #####"
[root@es83 elkuser]# chown -R elkuser:elkuser /logdata ./elasticsearch-7.2.0
[root@es83 elkuser]# ssh 192.168.100.86 "chown -R elkuser:elkuser /logdata /home/elkuser/elasticsearch-7.2.0"
[root@es83 elkuser]# ssh 192.168.100.87 "chown -R elkuser:elkuser /logdata /home/elkuser/elasticsearch-7.2.0"echo "##### 切換普通用戶,后臺運行elasticsearch服務 #####"
[root@es83 elasticsearch-7.2.0]# su elkuser
[elkuser@es83 elasticsearch-7.2.0]$ ./bin/elasticsearch -d
[elkuser@es83 elasticsearch-7.2.0]$ ssh elkuser@192.168.100.86 "/home/elkuser/elasticsearch-7.2.0/bin/elasticsearch -d"
[elkuser@es83 elasticsearch-7.2.0]$ ssh elkuser@192.168.100.87 "/home/elkuser/elasticsearch-7.2.0/bin/elasticsearch -d"echo "##### 自動生成用戶密碼(記得保存好用戶密碼) #####"
[elkuser@es83 elasticsearch-7.2.0]$ echo y | ./bin/elasticsearch-setup-passwords auto | tee elk_pwd.log
Initiating the setup of passwords for reserved users elastic,apm_system,kibana,logstash_system,beats_system,remote_monitoring_user.
The passwords will be randomly generated and printed to the console.Changed password for user apm_system
PASSWORD apm_system = HojN4w88Nwgl51Oe7o12Changed password for user kibana
PASSWORD kibana = JPYDvJYn2CDmls5gIlNGChanged password for user logstash_system
PASSWORD logstash_system = kXxmVCX34PGpUluBXABXChanged password for user beats_system
PASSWORD beats_system = rY90aBHjAdidQPwgX87uChanged password for user remote_monitoring_user
PASSWORD remote_monitoring_user = 0VxaGROqo255y60P1kBVChanged password for user elastic
PASSWORD elastic = NvOBRGpUE3DoaSbYaUp3echo "##### 測試es加密,查看集群狀態是否為green #####"
[elkuser@es83 elasticsearch-7.2.0]$ curl --tlsv1 -XGET "https://192.168.100.83:9200/_cluster/health?pretty" --user elastic:NvOBRGpUE3DoaSbYaUp3 -k
Kafka 是最初由Linkedin公司開發,是一個分布式、分區的、多副本的、多訂閱者,基于zookeeper協調的分布式消息系統;它具有高吞吐量、低延遲、可擴展性、持久性、可靠性、容錯性和高并發等特點,可以處理幾十萬條消息,延遲只有幾毫秒,集群式部署支持熱擴展,消息可被持久化到本地磁盤,防止數據丟失,而且支持數千個客戶端同時讀寫。
filebeat、在本文的架構中,kafka是用作緩存消息隊列,用來實時接收日志和發送日志到logstash,實現解耦和流量削峰,解決logstash消費能力跟不上導致的數據丟失問題;筆者采用的是kafka內置的zookeeper,也是以集群方式部署,無需再單獨搭建zookeeper集群服務。
注意:kafka的集群配置信息,狀態維護是存儲在zookeeper這個進程里的,所以kafka在啟動前需要先配置啟動zookeeper!
筆者為zookeeper服務分配了4G內存,為kafka服務分配了31G內存和5塊SSD磁盤,關于硬件配置大家根據實際情況來分配使用!
# 下載方式:wget https://archive.apache.org/dist/kafka/2.3.0/kafka_2.12-2.3.0.tgz
echo "##### 解壓Kafka #####"
[root@es83 ~]# cd /opt/
[root@es83 opt]# tar -xvf ./kafka_2.12-2.3.0.tgzecho "##### 修改zookeeper配置文件 #####"
[root@es83 opt]# cd ./kafka_2.12-2.3.0/
[root@es83 kafka_2.12-2.3.0]# cat > ./config/zookeeper.properties <<EOF
dataDir=/opt/zookeeper
clientPort=2181
maxClientCnxns=0
tickTime=2000
initLimit=10
syncLimit=5
server.1=192.168.100.83:2888:3888
server.2=192.168.100.86:2888:3888
server.3=192.168.100.87:2888:3888authProvider.1=org.apache.zookeeper.server.auth.SASLAuthenticationProvider
requireClientAuthScheme=sasl
jaasLoginRenew=3600000
4lw.commands.whitelist=
EOFecho "##### 創建zookeeper數據目錄和對應的myid文件 #####"
[root@es83 kafka_2.12-2.3.0]# mkdir /opt/zookeeper
[root@es83 kafka_2.12-2.3.0]# echo 1 > /opt/zookeeper/myidecho "##### 修改kafka配置文件 #####"
[root@es83 kafka_2.12-2.3.0]# cat > ./config/server.properties <<EOF
broker.id=83
listeners=SASL_PLAINTEXT://192.168.100.83:9092
advertised.listeners=SASL_PLAINTEXT://192.168.100.83:9092
num.network.threads=5
num.io.threads=8
socket.send.buffer.bytes=1024000
socket.receive.buffer.bytes=1024000
socket.request.max.bytes=1048576000
log.dirs=/logdata/kfkdata1,/logdata/kfkdata2,/logdata/kfkdata3,/logdata/kfkdata4,/logdata/kfkdata5
num.partitions=1
num.recovery.threads.per.data.dir=1
offsets.topic.replication.factor=1
transaction.state.log.replication.factor=1
transaction.state.log.min.isr=1
log.retention.hours=72
log.segment.delete.delay.ms=1000
log.cleaner.enable=true
log.cleanup.policy=delete
log.segment.bytes=1073741824
log.retention.check.interval.ms=300000
zookeeper.connect=192.168.100.83:2181,192.168.100.86:2181,192.168.100.87:2181
zookeeper.connection.timeout.ms=60000
group.initial.rebalance.delay.ms=0
delete.topic.enable=truesecurity.inter.broker.protocol=SASL_PLAINTEXT
sasl.enabled.mechanisms=PLAIN
sasl.mechanism.inter.broker.protocol=PLAIN
authorizer.class.name=kafka.security.auth.SimpleAclAuthorizer
allow.everyone.if.no.acl.found=true
super.users=User:admin;User:kafka
EOFecho "##### 創建zk和kafka的sasl jaas文件 #####"
[root@es83 kafka_2.12-2.3.0]# cat > ./config/zk_server_jaas.conf <<EOF
Server {org.apache.kafka.common.security.plain.PlainLoginModule required username="admin" password="chilu@rljie" user_kafka="chilu@rljie" user_producer="chilu@rljie";
};
EOF[root@es83 kafka_2.12-2.3.0]# cat > ./config/kafka_server_jaas.conf <<EOF
KafkaServer {org.apache.kafka.common.security.plain.PlainLoginModule requiredusername="admin"password="chilu@rljie"user_admin="chilu@rljie"user_producer="chilu@rljie"user_consumer="chilu@rljie";
};KafkaClient {org.apache.kafka.common.security.plain.PlainLoginModule requiredusername="kafka"password="chilu@rljie";
};Client {org.apache.kafka.common.security.plain.PlainLoginModule requiredusername="kafka"password="chilu@rljie";
};
EOFecho "##### 修改zk和kafka的啟動文件(增加SASL的環境配置) #####"
[root@es83 kafka_2.12-2.3.0]# sed -i -e 's/512M/4G/g' -e 's#Xms4G#Xms4G -Djava.security.auth.login.config=/opt/kafka_2.12-2.3.0/config/zk_server_jaas.conf#' ./bin/zookeeper-server-start.sh
[root@es83 kafka_2.12-2.3.0]# sed -i -e 's/1G/31G/g' -e 's#Xms31G#Xms31G -Djava.security.auth.login.config=/opt/kafka_2.12-2.3.0/config/kafka_server_jaas.conf#' ./bin/kafka-server-start.shecho "##### 將相關目錄復制到其他兩臺節點上,并進行修改 #####"
[root@es83 kafka_2.12-2.3.0]# cd ../
[root@es83 opt]# scp -r ./zookeeper ./kafka_2.12-2.3.0 192.168.100.86:/opt/
[root@es83 opt]# scp -r ./zookeeper ./kafka_2.12-2.3.0 192.168.100.87:/opt/
[root@es83 opt]# ssh 192.168.100.86 "echo 2 > /opt/zookeeper/myid ; sed -i '1,3s/83/86/' /opt/kafka_2.12-2.3.0/config/server.properties"
[root@es83 opt]# ssh 192.168.100.87 "echo 3 > /opt/zookeeper/myid ; sed -i '1,3s/83/87/' /opt/kafka_2.12-2.3.0/config/server.properties"echo "##### 后臺啟動zookeeper服務 #####"
[root@es83 opt]# cd ./kafka_2.12-2.3.0/
[root@es83 kafka_2.12-2.3.0]# ./bin/zookeeper-server-start.sh -daemon ./config/zookeeper.properties
[root@es83 kafka_2.12-2.3.0]# ssh 192.168.100.86 "/opt/kafka_2.12-2.3.0/bin/zookeeper-server-start.sh -daemon /opt/kafka_2.12-2.3.0/config/zookeeper.properties"
[root@es83 kafka_2.12-2.3.0]# ssh 192.168.100.87 "/opt/kafka_2.12-2.3.0/bin/zookeeper-server-start.sh -daemon /opt/kafka_2.12-2.3.0/config/zookeeper.properties"echo "##### 后臺啟動kafka服務 #####"
[root@es83 kafka_2.12-2.3.0]# ./bin/kafka-server-start.sh -daemon ./config/server.properties
[root@es83 kafka_2.12-2.3.0]# ssh 192.168.100.86 "/opt/kafka_2.12-2.3.0/bin/kafka-server-start.sh -daemon /opt/kafka_2.12-2.3.0/config/server.properties"
[root@es83 kafka_2.12-2.3.0]# ssh 192.168.100.87 "/opt/kafka_2.12-2.3.0/bin/kafka-server-start.sh -daemon /opt/kafka_2.12-2.3.0/config/server.properties"
當zk和kafka服務都啟動后,可以先檢查下相關端口狀態是否正常
[root@es83 kafka_2.12-2.3.0]# netstat -antlp | grep -E "2888|3888|2181|9092"
filebeat不讀取文件。當集群服務一切正常后,即可在其中一臺kafka節點上配置ACL訪問控制權限,對生產者producer和消費者consumer的主題topic和組group設置訪問權限,可以限制只允許指定的機器訪問。
提示:下面的mykafka是通過/etc/hosts自定義一個IP的域名,例如:192.168.100.83 mykafka;如果寫成localhost可能沒有權限,執行命令后會報NoAuth;如果寫成IP地址會報CONNECT !!!
echo "##### 編寫配置ACL訪問權限腳本 #####"
[root@es83 kafka_2.12-2.3.0]# cat > ./kfkacls.sh <<EOF
#!/bin/bash
/opt/kafka_2.12-2.3.0/bin/kafka-acls.sh --authorizer-properties zookeeper.connect=mykafka:2181 --add --allow-principal User:producer --allow-host 0.0.0.0 --operation Read --operation Write --topic elk
/opt/kafka_2.12-2.3.0/bin/kafka-acls.sh --authorizer-properties zookeeper.connect=mykafka:2181 --add --allow-principal User:producer --topic elk --producer --group chilu
/opt/kafka_2.12-2.3.0/bin/kafka-acls.sh --authorizer-properties zookeeper.connect=mykafka:2181 --add --allow-principal User:consumer --allow-host 0.0.0.0 --operation Read --operation Write --topic elk
/opt/kafka_2.12-2.3.0/bin/kafka-acls.sh --authorizer-properties zookeeper.connect=mykafka:2181 --add --allow-principal User:consumer --topic elk --consumer --group chilu
EOFecho "##### 執行腳本 #####"
[root@es83 kafka_2.12-2.3.0]# bash ./kfkacls.shecho "##### 查看ACL權限列表 #####"
[root@es83 kafka_2.12-2.3.0]# ./bin/kafka-acls.sh --authorizer-properties zookeeper.connect=mykafka:2181 --list# 提示:下面是交互式的命令配置
echo "##### 增加ACL訪問權限 #####"
[root@es83 kafka_2.12-2.3.0]# ./bin/zookeeper-shell.sh mykafka:2181
Welcome to ZooKeeper!
JLine support is disabledWATCHER::WatchedEvent state:SyncConnected type:None path:null此時可以直接在這個控制臺輸入命令
如ls / 查看ZK的目錄 檢查默認權限
getAcl /默認所有人可以查看
添加權限命令為:(僅添加kafka主機的IP)
setAcl / ip:192.168.100.83:cdrwa,ip:192.168.100.86:cdrwa,ip:192.168.100.87:cdrwa
setAcl /kafka-acl ip:192.168.100.83:cdrwa,ip:192.168.100.86:cdrwa,ip:192.168.100.87:cdrwa檢查是否生效
getAcl /
輸出:
'ip,'192.168.100.83
: cdrwa
'ip,'192.168.100.86
: cdrwa
'ip,'192.168.100.87
: cdrwa退出
quit
Logstash 是免費且開放的服務器端數據處理管道,采用的是可插拔框架,擁有200多個插件,支持各種輸入和輸出選擇,能夠實時解析和轉換數據,具有可伸縮性、彈性和靈活性;但是它比較消耗資源,運行時占用較高的CPU和內存,如果缺少消息隊列緩存,會有數據丟失的隱患,所以小伙伴們要結合自身情況來使用!
kafka部署?筆者在生產環境上,也為Logstash分配了30G內存,關于硬件配置大家根據實際情況來分配使用!
# 下載方式:wget https://artifacts.elastic.co/downloads/logstash/logstash-7.2.0.tar.gz
echo "##### 解壓Logstash #####"
[root@es83 ~]# cd /home/elkuser/
[root@es83 elkuser]# tar -xvf ./logstash-7.2.0.tar.gzecho "##### 修改啟動內存 #####"
[root@es83 elkuser]# cd ./logstash-7.2.0/
[root@es83 logstash-7.2.0]# sed -i -e 's/1g/30g/g' ./config/jvm.optionsecho "##### 復制相關所需證書到logstash目錄下 #####"
[root@es83 elkuser]# cd ./logstash-7.2.0/config/
[root@es83 config]# cp /home/elkuser/elasticsearch-7.2.0/root.pem ./echo "##### 修改logstash配置文件 #####"
[root@es83 config]# cat > ./logstash.yml <<EOF
http.host: "192.168.100.83"
node.name: "logstash83"
xpack.monitoring.elasticsearch.hosts: [ "https://192.168.100.83:9200" ]
xpack.monitoring.enabled: true
xpack.monitoring.elasticsearch.username: "elastic"
xpack.monitoring.elasticsearch.password: "NvOBRGpUE3DoaSbYaUp3"
xpack.monitoring.elasticsearch.ssl.certificate_authority: config/root.pem
xpack.monitoring.elasticsearch.ssl.verification_mode: certificate
xpack.monitoring.collection.interval: 30s
xpack.monitoring.collection.pipeline.details.enabled: true
EOF# 提示:配置的用戶名和密碼要跟kafka配置的一致!
echo "##### 配置接入kafka的客戶端文件 #####"
[root@es83 config]# cat > ./kafka-client-jaas.conf <<EOF
KafkaClient {org.apache.kafka.common.security.plain.PlainLoginModule requiredusername="consumer"password="chilu@rljie";
};
EOFecho "##### input和ouput的配置示例 #####"
[root@es83 config]# cat > ./test.cfg <<EOF
input {kafka {bootstrap_servers => "192.168.100.83:9092,192.168.100.86:9092,192.168.100.87:9092"client_id => "chilu83"auto_offset_reset => "latest"topics => "elk"group_id => "chilu"security_protocol => "SASL_PLAINTEXT"sasl_mechanism => "PLAIN"jaas_path => "/home/elkuser/logstash-7.2.0/config/kafka-client-jaas.conf"}
}filter {
}output {elasticsearch {hosts => ["192.168.4.1:9200","192.168.4.2:9200","192.168.4.3:9200"]user => "elastic"password => "NvOBRGpUE3DoaSbYaUp3"ssl => truecacert => "/home/elkuser/logstash-7.2.0/config/root.pem"index => "chilu_elk%{+YYYY.MM.dd}"}
}
EOFecho "##### 啟動logstash服務 #####"
[root@es83 config]# ../bin/logstash -r -f ./test.cfg
Kibana 是一個開源的分析和可視化平臺,可以為Logstash和ElasticSearch提供的日志數據進行高效的搜索、可視化匯總和多維度分析,并且與Elasticsearch索引中的數據進行交互;它基于瀏覽器的界面操作可以快速創建動態儀表板,實時監控ElasticSearch的數據狀態與更改等。
筆者在生產環境上,為Kibana分配了8G內存,關于硬件配置大家根據實際情況來分配使用!
# 下載方式:wget https://artifacts.elastic.co/downloads/kibana/kibana-7.2.0-linux-x86_64.tar.gz
echo "##### 解壓Kibana #####"
[root@es83 ~]# cd /home/elkuser/
[root@es83 elkuser]# tar -xvf kibana-7.2.0-linux-x86_64.tar.gzecho "##### 修改啟動內存 #####"
[root@es83 elkuser]# cd ./kibana-7.2.0-linux-x86_64/
[root@es83 kibana-7.2.0-linux-x86_64]# sed -i 's/warnings/warnings --max_old_space_size=8096/' ./bin/kibanaecho "##### 復制相關所需證書到kibana目錄下 #####"
[root@es83 kibana-7.2.0-linux-x86_64]# cd ./config/
[root@es83 config]# cp /home/elkuser/elasticsearch-7.2.0/client.p12 ./echo "##### 利用client.p12證書生成其他所需證書 #####"
[root@es83 config]# openssl pkcs12 -in client.p12 -nocerts -nodes > client.key
Enter Import Password: 回車Enter
MAC verified OK[root@es83 config]# openssl pkcs12 -in client.p12 -clcerts -nokeys > client.cer
Enter Import Password: 回車Enter
MAC verified OK[root@es83 config]# openssl pkcs12 -in client.p12 -cacerts -nokeys -chain > client-ca.cer
Enter Import Password: 回車Enter
MAC verified OKecho "##### 升級kibana的web界面為https訪問 #####"
[root@es83 config]# cd ../
[root@es83 kibana-7.2.0-linux-x86_64]# openssl req -newkey rsa:2048 -nodes -keyout server.key -x509 -days 3650 -out server.crt -subj "/C=CN/ST=guangzhou/L=rljie/O=chilu/OU=linux/"echo "##### 修改kibana的配置文件 #####"
[root@es83 kibana-7.2.0-linux-x86_64]# cat > ./config/kibana.yml <<EOF
server.name: kibana
server.host: "192.168.100.83"
elasticsearch.hosts: [ "https://192.168.100.83:9200" ]
xpack.monitoring.ui.container.elasticsearch.enabled: true
elasticsearch.username: "elastic"
elasticsearch.password: "NvOBRGpUE3DoaSbYaUp3"
xpack.security.enabled: true
elasticsearch.ssl.certificateAuthorities: config/client-ca.cer
elasticsearch.ssl.verificationMode: certificate
xpack.security.encryptionKey: "4297f44b13955235245b2497399d7a93"
xpack.reporting.encryptionKey: "4297f44b13955235245b2497399d7a93"
server.ssl.enabled: true
server.ssl.certificate: server.crt
server.ssl.key: server.key
EOFecho "##### nohup后臺啟動kibana服務(自行選擇后臺方式) #####"
[root@es83 kibana-7.2.0-linux-x86_64]# nohup ./bin/kibana --allow-root &
docker kafka,
curl --tlsv1 -XGET 'https://192.168.100.83:9200/_cluster/health?pretty' --cacert '/home/elkuser/elasticsearch-7.2.0/root.pem' --user elastic:NvOBRGpUE3DoaSbYaUp3
Filebeat 是一個用于轉發和集中日志數據的輕量級采集器,基于go語言開發,性能穩定,配置簡單,占用資源很少;它作為agent安裝在服務器上,可以監控你指定的日志文件或位置,收集日志事件,并將其轉發到配置的輸出;主要通過探測器prospector和收集器harvester組件完成工作。
# 下載方式:wget https://artifacts.elastic.co/downloads/beats/filebeat/filebeat-7.2.0-linux-x86_64.tar.gz
echo "##### 解壓Filebeat #####"
[root@es83 ~]# cd /home/elkuser/
[root@es83 elkuser]# tar -xvf filebeat-7.2.0-linux-x86_64.tar.gzecho "##### 修改filebeat配置文件 #####"
[root@es83 elkuser]# cd ./filebeat-7.2.0-linux-x86_64/
[root@es83 filebeat-7.2.0-linux-x86_64]# cat > ./filebeat.yml <<\EOF
filebeat.inputs:
- type: logenabled: truepaths:- /var/log/access.logclose_timeout: 1hclean_inactive: 3hignore_older: 2hfilebeat.config.modules:path: ${path.config}/modules.d/*.ymlreload.enabled: truesetup.template.settings:index.number_of_shards: 3setup.kibana:output.kafka:hosts: ["192.168.100.83:9092","192.168.100.86:9092","192.168.100.87:9092"]topic: elkrequired_acks: 1username: "producer"password: "chilu@rljie"
EOFecho "##### nohup后臺啟動filebeat服務 #####"
[root@es83 filebeat-7.2.0-linux-x86_64]# nohup ./filebeat -e -c filebeat.yml &
參考鏈接 :
Filebeat+Kafka+ELK生產部署(安全加固) :https://mp.weixin.qq.com/s/sJJYgzN6y5L5DBAQOvUq3A
版权声明:本站所有资料均为网友推荐收集整理而来,仅供学习和研究交流使用。

工作时间:8:00-18:00
客服电话
电子邮件
admin@qq.com
扫码二维码
获取最新动态