前言
? ? ? ? ? 作為程序員,不管是.net程序員還是java程序員其實從骨子里都不太喜歡各種配置文件的,記得剛開始學java SSH時動不動就裝B,來看看我的配置多不多,又是從.net開始寫java的程序員提起各種spring配置文件更是頭大,那么Spring Boot誕生了,Spring Boot的誕生只為在當前流行的微服務框架下簡化開發,不用再一上來就是各種配置文件了。
? ? ? ? ? 老生常談,先從Hello World寫起。本篇基于idea、maven搭建spring boot開發環境。
?
項目結構
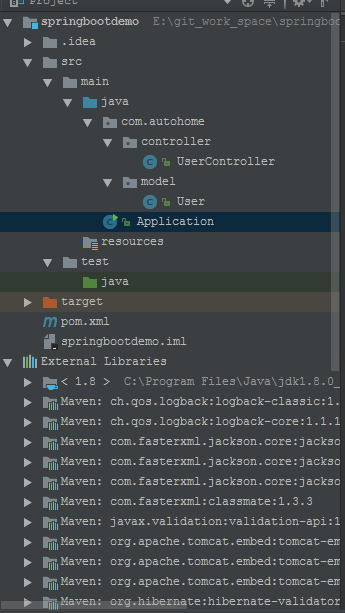
? ? ? ? ?先看下項目大致結構,基本骨架和ssm的項目結構保持相同,不同的是多了一個Application.java類,建議放在default package下。
?
基于idea+maven創建spring boot項目
1、我創建項目時,spring boot的最新版本是1.5.4
2、使用默認的maven項目創建,不勾選任何骨架。


OK、這樣一個默認的maven項目就起來了,當然,當前還不叫一個spring boot程序,打開pom.xml,增加spring boot需要的依賴包。最主要的就是spring-boot-starter-parent、
spring-boot-start-web。只需兩個依賴就能創建一個spring mvc程序。 是不是很happy。
<?xml version="1.0" encoding="UTF-8"?>
<project xmlns="http://maven.apache.org/POM/4.0.0"xmlns:xsi="http://www.w3.org/2001/XMLSchema-instance"xsi:schemaLocation="http://maven.apache.org/POM/4.0.0 http://maven.apache.org/xsd/maven-4.0.0.xsd"><modelVersion>4.0.0</modelVersion><parent><groupId>org.springframework.boot</groupId><artifactId>spring-boot-starter-parent</artifactId><version>1.5.4.RELEASE</version></parent><groupId>com.autohome</groupId><artifactId>springbootdemo</artifactId><version>1.0-SNAPSHOT</version><packaging>war</packaging><name>springbootdemo</name><dependencies><dependency><groupId>org.springframework.boot</groupId><artifactId>spring-boot-starter-web</artifactId></dependency></dependencies></project>
3、也可以用Spring Initializer骨架創建
? ? ?基于Spring Initializer創建spring boot項目更便捷,會直接讓你選擇你需要的模塊,比如AOP、Web、JPA之類。不過也看到了,這里依賴https://start.spring.io。我創建時提示我連不上服務器,直接看不到下一步的界面了,so sorry。

?
Spring Boot Hello World
?User.java
public class User {private Integer id;private String name;private String address;public Integer getId() {return id;}public void setId(Integer id) {this.id = id;}public String getName() {return name;}public void setName(String name) {this.name = name;}public String getAddress() {return address;}public void setAddress(String address) {this.address = address;}
}
UserController.java
package com.autohome.controller;import com.autohome.model.User;
import org.springframework.stereotype.Controller;
import org.springframework.web.bind.annotation.RequestMapping;
import org.springframework.web.bind.annotation.ResponseBody;@Controller
@RequestMapping("/user")
public class UserController {@ResponseBody@RequestMapping("/detail")public  User detail(Integer id){User user=new User();user.setId(id);user.setName("zhangsan");user.setAddress("china");return user;}}
?Application.java
? 這里用到了三個注解屬性:
? SpringBootApplication:它是Configuration、ComponentScan、EnableAutoConfiguration三個注解集合。 也就是說使用@SpringBootApplication(scanBasePackages = "com.autohome") 就可以替代前面三個注解,算是spring語法糖。
?
? ComponentScan:會自動掃描指定包下含有注解屬性的類,比如@Service、@Controller、@Repository。
? EnableAutoConfiguration:能夠自動配置上下文,試圖猜測和配置你想要的類。
?
import org.springframework.boot.SpringApplication;
import org.springframework.boot.autoconfigure.EnableAutoConfiguration;
import org.springframework.boot.autoconfigure.SpringBootApplication;
import org.springframework.context.annotation.ComponentScan;/*** Created by zhangfei on 2017/6/22.*/@SpringBootApplication
@ComponentScan("com.autohome")
@EnableAutoConfiguration
public class Application {public static void main(String[] args){System.out.println("server is running at 8080....");SpringApplication.run(Application.class,args);}
}
?
經過以上幾句代碼,右鍵運行Application.java,看控制臺提示

?
瀏覽器輸入:http://localhost:8080/user/detail?id=1
瀏覽器輸出:?{"id":1,"name":"zhangsan","address":"china"}
?