區別于一般語言中的注釋,程序運行時會根據注解,為標記注解的方法進行不同的操作,一般將注解寫在測試方法的前面,常用的注解如下:
@BeforeAll,這個注解的定義是使用了該注解的方法在當前整個測試類中所有的測試方法之前執行,每個測試類運行時只會執行一次。@AfterAll,與@BeforeAll相對應,這個注解定義是在使用了該注解的方法在當前測試類中所有測試方法都執行完畢后執行的,每個測試類運行時只會執行一次。@BeforeEach,這個注解表示了在每一個測試方法之前執行。注意不要與@BeforeAll概念混淆,@BeforeEach會每一個測試方法執行之前都會執行,@BeforeAll只會執行一次。@AfterEach,此注解表示在每一個測試方法執行之后都會執行。@Test,表示該方法是一個測試方法。@DisplayName,該注解為測試類或測試方法聲明了一個自定義顯示的名稱。@Tag,該注解表示為將測試類或者測試方法進行自定名稱的標記,使用了標記后可以通過這些標記用來過濾、測試、發現和執行。@Disabled,該注解用來禁止整個測試類或者測試方法的執行。如上結果使用了此注解的測試方法skipRun并沒有被執行,只輸出了skip run的禁止執行聲明。
package javatest;import org.junit.jupiter.api.*;
import org.junit.jupiter.api.Test;@DisplayName("Common annotation test")
public class AnnotationsTest {private static Add add;@BeforeAllpublic static void beforeAll() {add=new Add();System.out.println("This is beforeAll");}@BeforeEachpublic void beforeEach() {System.out.println("This is beforeEach");}@AfterEachpublic void afterEach() {System.out.println("This is afterEach");}@AfterAllpublic static void afterAll() {System.out.println("This is afterAll");}@Disabled@Test@DisplayName("Ignore the test")public void disabledTest() {System.out.println("This is disabledTest");}@Test@DisplayName("Test Methods 1+1")public void testAdd1() {System.out.println("This is Test1");Assertions.assertEquals(2,add.add(1,1));}@Test@DisplayName("Test Methods 2+2")public void testAdd2() {System.out.println("This is Test2");Assertions.assertEquals(4,add.add(2,2));}}用于檢測傳進去的參量,在測試方法中起特別大的作用,相當于真正判斷邏輯值是否相等的方法,邏輯值相等則認為該斷言通過,不相等則報錯。
package javatest;import static java.time.Duration.ofMillis;
import static java.time.Duration.ofMinutes;
import static org.junit.jupiter.api.Assertions.*;import org.junit.jupiter.api.Disabled;
import org.junit.jupiter.api.Test;class Assert {@Testvoid standardAssertions() {assertEquals(2, 2);assertEquals(4, 4, "error message");assertTrue(2 == 2, () -> "error message");}@Testvoid groupedAssertions() {assertAll(() -> assertEquals("John", "John"),() -> assertEquals("Doe", "Doe"));}@Testvoid dependentAssertions() {assertAll("properties",() -> {String firstName = "John";assertNotNull(firstName);assertAll("first name",() -> assertTrue(firstName.startsWith("J")),() -> assertTrue(firstName.endsWith("n")));},() -> {String lastName = "Doe";assertNotNull(lastName);assertAll("last name",() -> assertTrue(lastName.startsWith("D")),() -> assertTrue(lastName.endsWith("e")));});}@Testvoid exceptionTesting() {Throwable exception = assertThrows(IllegalArgumentException.class, () -> {throw new IllegalArgumentException("a message");});assertEquals("a message", exception.getMessage());}@Testvoid timeoutNotExceeded() {assertTimeout(ofMinutes(2), () -> {});}@Testvoid timeoutNotExceededWithResult() {String actualResult = assertTimeout(ofMinutes(2), () -> {return "result";});assertEquals("result", actualResult);}@Disabled@Testvoid timeoutExceeded() {// 斷言超時,會在任務執行完畢后才返回,也就是1000毫秒后返回結果assertTimeout(ofMillis(10), () -> {// 執行任務花費時間1000毫秒Thread.sleep(1000);});}@Disabled@Testvoid timeoutExceededWithPreemptiveTermination() {// 斷言超時,如果在10毫秒內任務沒有執行完畢,會立即返回斷言失敗,不會等到1000毫秒后assertTimeoutPreemptively(ofMillis(100), () -> {Thread.sleep(1000);});}}
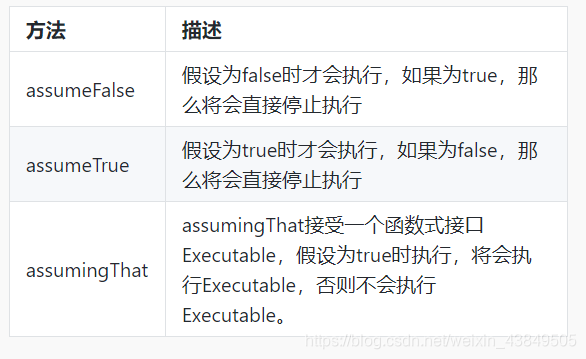
假設的作用更像是進行if-else判斷,只有假設的條件滿足,才會進行該測試方法后續的內容,否則將會中斷當前測試方法。
import static org.junit.jupiter.api.Assumptions.assumeFalse;
import static org.junit.jupiter.api.Assumptions.assumeTrue;
import static org.junit.jupiter.api.Assumptions.assumingThat;import org.junit.jupiter.api.Test;class Assumption {@Testvoid assumeTrueTest() {//如果假設傳入的值為True,那么就會執行后面測試,否則直接停止執行assumeTrue(false);System.out.println("This will not be implemented.");}@Testvoid assumeFalseTest() {//如果假設傳入的值為false,那么就會執行后面測試,否則直接停止執行assumeFalse(true);System.out.println("This will not be implemented.");}@Testvoid assumingThatTest() {//    assumingThat?(boolean assumption, Executable executable)//assumingThat 接受一個boolean值assumption,如果assumption為true,那么將會執行executable,否則不會執行,//但是assumingThat即使為false也不會影響后續代碼的執行,他和assumeFalse和assumeTrue不同,assumingThat只//決定Executable是否執行,Executable是一個函數式接口,接受一個沒有參數和返回值的方法。assumingThat(false,() -> {System.out.println("This will not be implemented.");});//下面的輸出將會執行System.out.println("This will be implemented.");}
}
禁用的操作就比較簡單,理論上屬于前面注解的一種。@Disabled注解可以注解在方法上或者注解在類上,注解在方法上時禁用對應的方法,注解在類上的時候禁用該類中所有的測試。
import org.junit.jupiter.api.Disabled;
import org.junit.jupiter.api.Test;class DisabledTest {@Test//使用@Disabled注解關閉@Disabledvoid disabled() {System.out.println("Not running");}@Testvoid open() {System.out.println("running");}
}
junit怎么用,可以看做一般語言中的循環,設定初始值并循環進行測試,節省了一次一次輸入測試數據的時間。也用到了注釋的方法。通過@RepeatedTest注解可以完成重復測試的工作,@RepeatedTest中的value屬性可以設置重復的次數,name屬性可以自定義重復測試的顯示名,顯示名可以由占位符和靜態文本組合,目前支持下面幾種占位符:{displayName}: 顯示名、{currentRepetition}: 當前重復次數、{totalRepetitions}: 總重復次數。
name屬性實際上就是改變了測試在控制臺輸出的內容,不寫會顯示默認的格式。
import org.junit.jupiter.api.DisplayName;
import org.junit.jupiter.api.RepeatedTest;
import org.junit.jupiter.api.RepetitionInfo;
import org.junit.jupiter.api.TestInfo;class Repeated {//自定義重復測試的顯示名稱@RepeatedTest(value=10,name="{displayName}-->{currentRepetition}/{totalRepetitions}")@DisplayName("repeatTest")void repeatedTest(TestInfo testInfo,RepetitionInfo repetitionInfo) {//我們可以通過TestInfo在測試中獲取測試的相關信息,比如輸出自定義的測試名System.out.println(testInfo.getDisplayName());//輸出當前重復次數System.out.println("currentRepetition:"+repetitionInfo.getCurrentRepetition());}}
與重復測試很相似,區別在于參數化測試是在給定的測試集合里面進行重復測試,而普通的重復測試僅僅是暴力。相當于重復測試的增強版。參數化測試使用@ParameterizedTest 注解聲明,而且參數化測試必須聲明至少一個參數源,用@ValueSource等注解參數源。參數化測試會分別將參數源里面的內容作為形參輸入進測試方法中。
參數源的注解也有很多類。@ValueSource允許指定單個文字值數組,并且只能用于為每個參數化測試調用提供單個參數。@EnumSource提供了一種使用 Enum 常量的便捷方法。注釋提供了一個可選 names 參數,允許指定應使用哪些常量。如果省略,將使用所有常量。@MethodSource允許引用測試類或外部類的一個或多個工廠方法。@CsvSource允許將參數列表定義為以逗號分隔的值(即String類型)。@CsvSource使用單引號’作為引號字符。空的引用值’'會被解釋成空的的 String 類型; 而完全空值被解釋為 null。@ArgumentsSource @ArgumentsSource可用于指定自定義,可重用 ArgumentsProvider。
import java.util.concurrent.TimeUnit;
import java.util.stream.Stream;import org.junit.jupiter.api.extension.ExtensionContext;
import org.junit.jupiter.params.ParameterizedTest;
import org.junit.jupiter.params.provider.Arguments;
import org.junit.jupiter.params.provider.ArgumentsProvider;
import org.junit.jupiter.params.provider.ArgumentsSource;
import org.junit.jupiter.params.provider.CsvSource;
import org.junit.jupiter.params.provider.EnumSource;
import org.junit.jupiter.params.provider.ValueSource;class ParameterTest {@ParameterizedTest@ValueSource(strings= {"shi","yan","lou"})void parameter(String args) {System.out.println(args);}@ParameterizedTest//使用names制定需要的枚舉常量@EnumSource(value = TimeUnit.class, names = { "DAYS", "HOURS" })void enumSource(TimeUnit timeUnit) {System.out.println(timeUnit.toString());}@ParameterizedTest@CsvSource({ "shi, 1", "yan, 2", "'lou, plus', 3" })void csvSource(String first, int second) {System.out.println(first+"---"+second);}@ParameterizedTest@ArgumentsSource(MyArgumentsProvider.class)void argumentsSource(String argument) {System.out.print(argument);;}static class MyArgumentsProvider implements ArgumentsProvider {@Overridepublic Stream<? extends Arguments> provideArguments(ExtensionContext context) {return Stream.of("shi-", "yan-", "lou\n").map(Arguments::of);}}
}
一般情況下不使用禁用注解,會執行測試程序中的所有測試方法,但是具體使用時如果只想用所有測試方法中的幾個進行測試,就可以使用過濾測試。通過tag注解,對測試方法進行標注,測試時選擇幾個進行運行。在測試文件上單擊右鍵->run as ->run configurations,點擊configure,在輸入框中填入需要運行的測試方法的標簽名,點擊 ok,接著點擊 Run。這樣就只會運行選中的幾個測試方法,使得整個測試程序更加靈活。
版权声明:本站所有资料均为网友推荐收集整理而来,仅供学习和研究交流使用。

工作时间:8:00-18:00
客服电话
电子邮件
admin@qq.com
扫码二维码
获取最新动态